
Easy to Make Creamy Homemade Oat Milk
Over a year ago, I went on a food elimination diet that my doctor recommended. Little did I know that ultimately I would find that I have food sensitivity to dairy, gluten, soy and so much more. I thought that dairy ( cow’s milk ) would be the most difficult thing to cut out, but I have found great options that help me to still feel like I am getting those things without the stuff that makes me sick. After much trial and error, I started to prefer oat milk over other “non-dairy milks”. I found however that many of those milk alternatives had ingredients in them that I did not want. Plus, store bought oat milk is so expensive! So I began the journey of making my own homemade oat milk. Let me show you what I have found to work the best!

I have had a lot of trial and error with homemade oat milk, and the biggest thing I have noticed when making it at home is that it can become slimy super quickly. But, there are things that you can do to eliminate the slimy texture from your oat milk.
There are a couple of key things that you need to do when making homemade oat milk:
- use ice cold water
- only blend the oats and water for 30-45 seconds
- strain immediately and put it in the fridge
I will expand on these in a little bit.
First, lets talk about how exactly you can make your own creamy homemade oat milk:
I use old fashioned oats for my own oat milk. First you want to start with a clean blender. You want to have a couple of things on hand to make this a quick process.
- nut milk bag (you can also use cheese cloth to strain the milk)
- sieve or fine mesh strainer
- glass jar or container ( I use these kinds and love them)
- high-speed blender
Main ingredients:
- 1 cup old fashioned rolled oats or steel-cut oats (dont use instant oats)
- 4 cups water
Optional Ingredients
- dates / pure maple syrup / vanilla extract (or any sweetener you want)
- pinch of salt
- coconut oil
Creamy Homemade Oat Milk
Equipment
- 1 high speed blender
- 1 fine-mesh strainer
- 1 nut milk bag
Ingredients
- 1 cup old fashioned rolled oats
- 4 cups ice cold water
Optional Ingredients
- 3 tbsp pure maple syrup
- 2 Dates soaked in water for at least an hour
- pinch of salt
- vanilla for flavor
Instructions
- Add 4 cups of ice cold water to a blender
- Add 1 cup of oats
- Blend on High for 30-45 seconds
- Immediately strain the milk through a fine mesh strainer to get the bulk of the oat pulp out of the milk. I like to alternate and strain it 3-4 times.
- Then run your milk through a nut milk bag.
- Add your sweetener and flavorings such as maple syrup and vanilla at this time. If you choose to use dates to sweeten the milk, blend them with the oats and then strain them out.
- Put the milk in an airtight glass container such as a mason jar or milk jug.
- Keep in the fridge for 6-7 days.

Here are my step by step instructions for DIY oat milk:
Okay lets begin. If you choose to use dates as a sweetener you can soak them for about an hour to soften them prior to use. They are not absolutely necessary since you can use any sweetener you want. You can also make this without any sweetener if you want a more neutral milk option.
So, to begin, you want to put 4 cups of water (needs to be ice cold) in your blender. You can add your sweetener at this point or wait, whatever you like. I put mine in at this point so I don’t have to worry about it after its all strained. I add two dates and about 3 tbsp of pure maple syrup. You can also add a pinch of salt to help balance the milk, but I not usually. I have also seen some people add a tablespoon of coconut oil to help thicken the milk, but I find it creamy enough for me without it.
Add one cup of oatmeal to the blender and immediately blend on high for 30-45 seconds. Now, immediately strain the milk into another container to get the bulk of the ground up oats out of the milk.
I like to alternate straining the milk back and forth about 4 times to get most of the oats out. For best results the more you strain the milk the less slimy it will be. At this point I then pour the milk into the nutbag and carefully squeeze the milk through the bag. At this point you will have your milk strained plenty.
At this point, taste the milk and decide if you want it sweeter. I say this is where you flavor with your heart. Find the sweet spot of what you prefer.
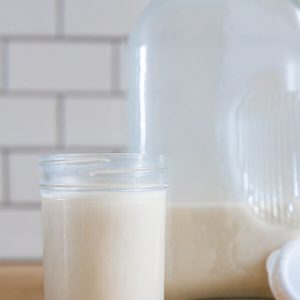
After the homemade oat milk is strained, I our it into my glass jar, add a lid and place it in the fridge. It is ready to use at this point.

Fresh homemade oat milk is amazing! I think it tastes so good. And guess what I use it on in the morning? My morning oatmeal haha! Don’t worry, I will be sharing my favorite oatmeal recipe soon!
Now, a few things to consider.
Your oat milk will separate. I have never made it when it did not separate. I just give it a quick shake before using and its all good. Also, I only keep this kind of oat milk in the fridge for 6-7 days. After that I will discard any that is left, but that is pretty rare since I use it everyday. Since you are only making 4 cups of oat milk at a time it shouldn’t last too long. Also, to help prevent slimy oat milk use ice cold water and strain it immediately. Just remember to give it a good shake when you are ready to use it out of the fridge.
The slime factor may freak you out, but don’t let it. This milk will be naturally thick and you may need to try a little bit of trial and error to get it right depending on your own situation.
If you have Celiac disease you may want to make sure to use a brand of certified gluten-free oats. I know Bob’s Red Mill has a gluten free oatmeal that is great. Even if you have a gluten sensitivity, it will be wise to use one of these oats.
The best part of making homemade oat milk….the savings! You only use 1 cup of oats for every 4 cups you make. That’s mere pennies!

I think that homemade oat milk is amazing, and is something we can all make. If you find that you are tired of purchasing expensive oat milk, give this a try. You can use a mason jar to store it or invest a small amount in some jars like the ones below. Between the nut milk bags and the jars I spent 30 dollars. I will be using the glass jars to store my goats milk in the summer so they will be used often and very worth the purchase. The nut milk bags are also something I have been wanting for a while so I am happy I finally got some.
The best thing about this is that you can use simple food storage items to make it. I always have a stockpile of oatmeal since we eat it so often. My pantry is stocked with pure maple syrup. Between these two things I can make as much homemade oat milk as I want.

Why not give it a try yourself! You’ve got 5 minutes!
Make yourself some delicious homemade oat milk. You just might prefer it over regular milk! Using simple ingredients you can make creamy oat milk that you can enjoy. How great it is to know exactly what is in your food. I think it almost tastes better because I know exactly how it was made. With a creamy texture and mild flavor is it the perfect milk substitute.
PIN IT!

Make sure to PIN this for later and make sure to follow me on Pinterest where I am always sharing tons of great ideas!