
DIY Industrial Farmhouse Hanging Light
I have gone over this project in my head so many times. The plan was there, all laid out, inside my head, I only needed to find a way to get it out. Who knew trudging through my “junk yard” would be exactly what I needed. My DIY industrial farmhouse hanging light turned out better than I imagined, and I am going to show you how I did it.
A few months ago I purchased these hanging edison bulb from Amazon.

Actually, I bought 2 of them. They were about just over 14 dollars each. I tell you it is a steal! It comes with a 15 foot rope cord.
I thought about all the different options of what I could do with these lights, and as a I was wondering through my small junk pile….also known as my pile of amazing salvaged items, I ran across some wire fencing that was exactly what I was looking for. It was fencing with 2 by 4 inch grids. I cute two pieces like the one below.

Here are the tools that I used for this project.
8-Inch Long Nose Plier![]()
Multi Tool Stripper, Cutter and Crimper![]()

I bent all the outside pieces in.

It looks kind of like a weird insect to me:)

![]()
If you look at the bottom pieces, I have bent the right ones with the loop towards the outside, and on the left, they are bent down.

I hooked the two pieces together on both sides. The pieces that I bent into a loop hook right together.

I then repeated this on each level. I cut about a 1.2 inch off each row so that it gradually got more narrow toward the top.


When you get to the last pieces of wire at the top, you are done with that section.

The top pieces will be bent onto each other creating 2 X’s.

There is a reason for this. I will make loops on the ends of these wire pieces as well.


Hook the two bottom ones together at an angle.

Next, you want one of the top wires to be under one of the bottom wires and one over the top.

That is the last thing you need to do. The reason I did this is so that it will hold securely over the top of the light. I did not want to add anything foreign to the cage to hold the light bulb. I can feed the wire through this little center section and then it will tighten down because of the tension.


Once I fed the wires through the cage, I was able to hang them. They light bulbs also came with a hook to hank them with, so I screwed it into the ceiling into a floor joist for strength.


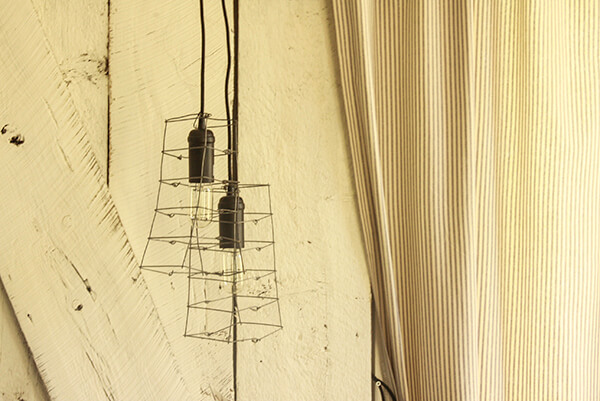
I hung this DIY industrial farmhouse hanging light fixture above a side table in my family room. The table is flanked by two comfy chairs. I wanted some task lighting for this area to create a cozy space where one could read or just enjoy the ambiance. Having them hang instead of adding a table lamp, it keeps the space open.
These lights were just the touch that my little nook needed. I really like the way they turned out. Just enough industrial goodness to accent the vintage farmhouse look of the Edison bulbs.
If you like the look of these but don’t think that this is a project you want to tackle, you can pick up similar light cages on Amazon.

![]()

![]()

This DIY industrial farmhouse hanging light was a simple project that I completed in a few hours. ![]() I love adding original elements to my home. Something I know nobody else will have. It is also satisfying to create something myself. I hope you enjoy it too.
I love adding original elements to my home. Something I know nobody else will have. It is also satisfying to create something myself. I hope you enjoy it too.

Thanks for stopping by and seeing what was happening at Twelve On Main. Have a great day and remember…


*This post contains affiliate links*
[optin-cat id=”3417″]
If you like this post, you’ll love:
My favorite products:
My daughter would love this, she is an industrial kind of girl.
This is awesome!!!!! I will be making this 🙂
Yay! Thanks so much!
Wow, these are so cool! They look pretty easy to make too (which is awesome). Thanks for another creative and gorgeous DIY idea!
They look truly simple to make as well (which is marvelous). A debt of gratitude is in order for another innovative and lovely DIY thought!
Than you!