
Our DIY Greenhouse Design and Reveal
Well friends, if there is one thing I have learned during the Corona quarantine, it is that we can get a lot done when we are forced to stay home. We found ourselves knee deep in project after project. The most recent project that we completed is our DIY greenhouse! I am so excited to share our new greenhouse design with you and I have partnered with Wagner Spray Tech to show you how easy it is to use one of their paint sprayers to finish the job.

I have been wanting a greenhouse in my backyard for a very long time. Honestly, if I could have a huge greenhouse, my heart would be the most happy, but for our needs, I knew a small greenhouse would be sufficient. We did a ton of research. I looked into purchasing a manufactured one. I also considered the very most inexpensive ones I could find. But, when all won out, we decided a DIY greenhouse was what we needed to undertake.
There are a couple reasons why we decided to build one instead of buy one. First, all the greenhouses I was looking at looked as if they might not last in our weather. We have so so so much wind in the spring that I knew one of the light weight poly carbonate greenhouses would be an issue and would probably get damaged.
We needed something heavy duty.
All the heavy duty greenhouses for purchase are so very expensive. I didn’t want to spend the money when I thought maybe I could build one myself.
YOU CAN BUILD ONE TOO! GET MY GREENHOUSE BUILDING PLANS BELOW~
We decided to build an 8 by 5 foot DIY greenhouse design.
I came up with the design on my own. I drew a ton of different options up, but in the end, I had a vision of how I wanted it placed in my garden, which way I wanted it faced, and how I wanted it to look. The reason we kept it on the smaller side was because I wanted it in the garden, and to be a focal point, and I did not want it to take up all the garden space!
For a long time, I had a vision of being able to walk in the garden on a rock path, turn left and follow another rock path straight for the greenhouse which was flanked on either side by pumpkins patches, rows of corn and so much more.
The design of my greenhouse was dictated by the desire to have it in a certain location, with specific access points and focal points.
I have to say that this greenhouse has turned out to be the perfect accent to my garden. Its right there, close to everything. I can plant, work in the greenhouse and do various other activities without having to go very far. Functionally it is pretty great, and aesthetically its pretty great too!
Of course, with everything I do, I wanted it to look good. Why on earth would I have a greenhouse in my garden that wasn’t pleasing to the eye. I strongly believe that you can have function with beauty.
Our greenhouse design:
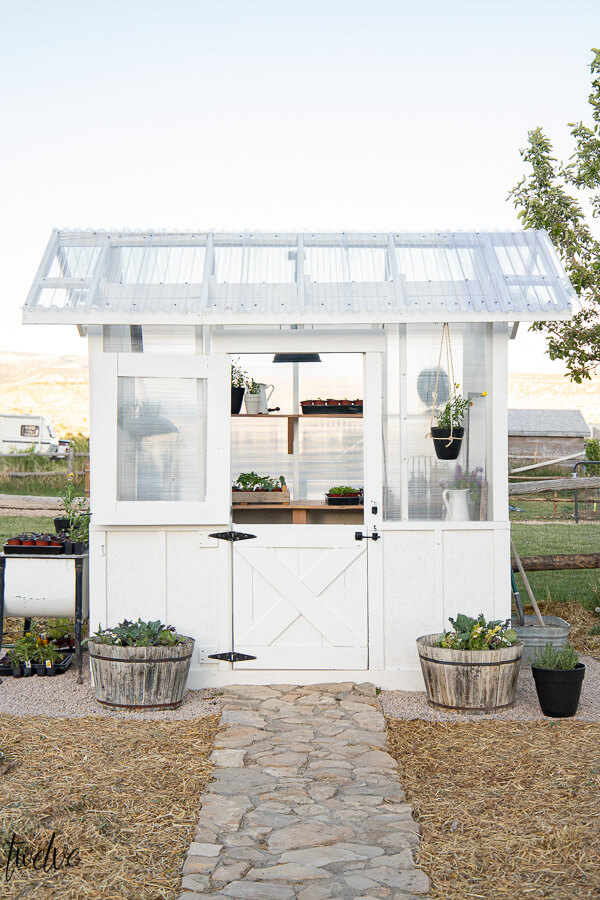
The design for our greenhouse started with the front door. I wanted the door to face the garden, and I also wanted it to be a full size door. Not only did I want a full size door but I wanted the door to be a dutch door that could function as the window for our greenhouse.
We planned this greenhouse so that we could add a small window to the eaves if we need, but so far, the temperatures have been great with the dutch door opened daily. We have a hook to secure the door so that it can easily be locked tight against the wall.
With a full size and height door, that meant the walls were high. We used 2 by 4’s that were 8 ft long.
Lets start at the bottom.
We used pressure treated beams as the footer of the greenhouse. We filled the area inside the beams with sand and concrete pavers. They fit perfect inside without having to cut any of them. This serves as the floor to the greenhouse. It makes it easy to use water, and spray down everything and the water drains down through the concrete pavers.
We built the walls as we would any building, raising on wall at a time with studs that were 24 inches apart.
The roof was built to overhang 14 inches on the sides to give the greenhouse some visual weight.
We built a wall 2/3 up the greenhouse, adding board and batten to it.
Before we went any further, it was time to do the painting for our DIY greenhouse.
I wanted all the wood to be painted white, including all the roof beams. We finished off the board and batten and then I got to work with my most favorite spray gun.

(yes it has been well loved and well used!)
I decided to use my Wagner Control Pro 130 Power Tank Sprayer. This is by far my most favorite paint sprayer. It is the same one I used on my treehouse. It is so efficient and sprays so quickly! I love how fast I can paint an entire building!
The Control Pro 130 Power Tank Sprayer is perfect for big interior and exterior jobs and can be used with a wide range of unthinned paints and stains.

This sprayer helps take the scariness out of airless spraying with fast and easy set up and unmatched control, all while delivering continuous painting and fast coverage. The Control Pro 130 is perfect for painting the exterior of your home, staining a large deck, and it is perfect for a greenhouse.
It is gravity fed for fast, no mess priming and cleaning. The spray gun also features High Efficiency Airless technology that creates soft fan pattern edges so you can achieve a smooth, amazing finishes.
This Wagner airless paint sprayer produces up to 55% less overspray than traditional airless sprayers. This means cleanup is so much easier and there is less overspray to deal with!
Watch my time lapse video below to see how I painted our greenhouse:
This Wagner paint sprayer is amazing. I love that the paint is in a reservoir on the ground and I only have to hold the sprayer. This makes it lighter and easier to maneuver than the sprayers with the paint reservoir connected to the handheld sprayer. This paint sprayer holds at least 1 gallon of paint at a time which makes it so much more efficient and I spend less time refilling.

With all the times I have used this sprayer I have been impressed with the power and the even spray that you get. I did do a time lapse video, but this took me less than an hour to spray the entire building inside and out. And of course, I picked a very windy day to paint and it still painted like a champ. My husband commented that he couldn’t believe I had it all done before he woke up from his nap haha!

I painted everything before we put the polycarbonate panelling on the walls and the clear roof. That way I did not have to tape anything off and I could paint with ease. It made the next steps so much easier.
After I painted the greenhouse, we screwed in the polycarbonate panels we purchased for the walls. These were incredible easy to use. The goal was to do something economical that eventually we could replace if needed with actual windows. So for right now, these panels work great, but eventually I would love to upgrade to windows.

We used clear plastic roofing panels on the roof. It was so easy to install as well. This gave the greenhouse full access to the sun throughout the day.

The dutch door is the focal point of the front of the greenhouse. Can you believe my husband built it and added polycarbonate panelling to the top door to keep the light flowing through?

This door comes in handy as a window. I open it every morning and latch it to the wall.


We built some wood shelves along the back wall next. Since the layout was 5 by 8, the back wall that was the longest was going to be our main space to hold our plants.


We built two lower shelves and one upper shelf. I added on to the main countertop and created an L shape continuing it on the left side of the building.

(this is how it looked when I had it full of plants. As we slowly are planting them, its starting to empty out)

A couple days later I decided to build me a little desk inside the greenhouse, on the right side of the building.


Its a bit lower than the other shelves, and I was able to fit my cute little foldable movie chair right under it. It is the perfect place to sit and work on garden ideas, work on my blog, or simply just a place to eat my mint chocolate chip ice cream and hide from the world.

I used some glass jars to store my organic fertilizer, epsom salts, and crushed egg shells.

It makes it look pretty and its very functional. No plastic bags spilling or rotting in a basket on a shelf.

How adorable is this metal ant? My mom gave me two of them and I had to use them in the greenhouse.
My husband even installed power into the greenhouse. There is an adorable light overhead, and and couple outlets so that I can use a heater in the winter and a fan in the summer. We have been using the fan lately and it has been really nice to have.


I have to say that this greenhouse is a dream come true for me. There was no time wasted, as I started my own seeds this year. I love being able to create and grow our own food and now we have a dedicated space to do that.

I created a space outside of our DIY greenhouse as well. We laid down landscape fabric and pea gravel to keep the weeds away. My goal this year is to keep the weeds at bay! To the left of the greenhouse, I set up my vintage laundry wash tub as a place to set out extra plants when I am hardening off plants before planting.


I also plan to use it as a place to wash veggies before bringing them inside. Up until now, brought everything in the house and that included the earwigs and other bugs and dirt. This way I can give them a wash before bringing them in to prepare and store.


The two planters in front of the greenhouse are filled with more edible yumminess.

I love planting flowers but in the past couple years, I have felt that if I was going to put a ton of energy into keeping them alive I want to get something from them. So I have planted more broccoli, some cabbage and kale.

There are also some herbs tucked in there. I am excited to see them filled up with yummy veggies.
The other big project we did to finish off our DIY greenhouse was to install the flagstone rock walkway. I cannot tell you how thrilled I am to be able to come in and out of my garden and greenhouse without trudging through the mud.

This walkway makes a big statement in the garden, and I am so glad we did it.
Now, lets talk about the budget for this DIY greenhouse:
This is the part nobody likes to talk about! But, since we started this at the beginning of the quarantine, we wanted to make sure that we stayed on budget and spent as little as possible. We ended up spending just a little more than 700 dollars to build the greenhouse. The shelves inside were not added in, nor was the light. The light was 40 dollars on Amazon and the shelving was made with wood we already had in our stash.
We also already had the paint sprayer and saws/other tools to build our DIY greenhouse.
We added up how many pieces of lumber we needed, as well as how many polycarbonate panels, roofing panels, and plywood for the board and batten. I was pretty impressed that we stayed under our budget. From shopping around a looking at pre-made greenhouses, even the cheapest ones we could find were about 600 dollars. So, we were able to build something more sturdy, and longer lasting for nearly the same amount of money.

I am so excited to use this greenhouse to its full extent.

It is going to be my getaway, my place to sneak away and work. In the summer and in the fall, it will be the backdrop to some entertaining, dining and more. There are endless options to what we can use this place for.
Everyday I walk outside and I smile. I love the space we are creating out in the backyard. We now have our goat house, our treehouse, the chicken coop, and now we can add our DIY greenhouse to the list. I could literally never leave here and be so very happy.


Make sure to follow me on Pinterest, Instagram and Facebook to see what I we are working on~
Want to see more about paint sprayers? Check out this post:
How to Paint Stairs and Railings Like a Pro with Wagner Paint Sprayers
Gorgeous Office Bookshelves with a Built In Electric Fireplace
How about more great home decor content?
The Ultimate Farmhouse Bedroom Decor Ideas
Farmhouse Master Bathroom | Final Reveal
One Room Challenge- Farmhouse Laundry Room Reveal!
Wow, you guys have really been busy, i love this greenhouse it is cute and useful just like your hen house and goat shed. You are going to have the nicest place in your neighborhood.
Your greenhouse is amazing. I want one too. I’m 70 years old so I better get going on mine. It looks so peaceful and calming. Thank you for sharing.
I am totally in love with what you did!
We built ours about 4 years ago and learned some lessons along the way – we used reclaimed windows we purchased at the habitat store, but we use it so much in the spring and i’m planning on doing some seed starting for winter crop…also seeing if I can grow fresh tomatoes during the winter (it gets pretty hot in there)
It looks great. Love the walkway and pea gravel as well. Nice job!
Absolutely AWESOME!
Greenhouse envy! Trying to figure out if I can get this past my HOA…looks like a shed to me!
So happy and excited for you!
Ooh that would be awesome for you!
Wonderful information about our diy greenhouse design reveal, thanks a lot for sharing kind of content with us. Your blog gives the best and the most interesting information. I wonder if we can gather such practical information about it, a great post definitely to come across. Wonderful information about our diy greenhouse design reveal, thanks a lot for sharing kind of content with us. Your blog gives the best and the most interesting information. I wonder if we can gather such practical information about it, a great post definitely to come across.Do visit this https://www.interiorpainting.co.nz For vital information that can be used again by anyone
Love the design and concept. I just purchased your plans and not listed is your overall height of the 4 walls. What is the overall height please?
Thank you
They are 8 ft tall. Standard height of a 2 by 4 stud
I loved your blog and thanks for publishing this about our diy greenhouse design reveal !! I am really happy to come across this exceptionally well written content. Thanks for sharing and look for more in future!! Keep doing this inspirational work and share with us.
I love this post, and so in love with that fabulous door. Niceeeee! Thanks for sharing
I love your cute greenhouse! Approximately how much did it cost to build? I’m trying to decide if it’s in my budget!