
Easy Sourdough Bread Recipe with Herbs, Garlic and Sharp Cheddar
With fall nearing our area soon, I have been. spending more time in the kitchen prepping and creating fantastic new recipes and today I have a doozy! This easy sourdough bread recipe with herbs, garlic and sharp cheddar cheese is hands down one of the best breads I have made…and I have made a lot! I want to show you how I make it and how easy sourdough bread can actually be!

What is a sourdough starter?
A sourdough starter is a flour and water mixture that overtime ferments. A sourdough starter is a symbiotic community of lactic acid bacteria and wild yeast. Both yeast and bacteria feed on the carbohydrates present in flour when hydrated with water and allowed to ferment. Keep in mind this is not traditional yeast, but it is a wild natural yeast grown in the sourdough starter. A healthy starter will smell yeasty and have a slightly sour smell. If it smells like vomit or parmesan cheese, something is off, and it will need to be fed more often or other adjustments will need to be mad.
Do you need commercial yeast for this easy sourdough bread recipe?
No you do not need traditional yeast. You want an active sourdough starter. You can tell its ready to be used if there are tons of living bubbles in the starter and it is doubling in size when it is fed more flour and water. If you are unsure, a general rule is about 4 hours after you feed it. Another tip is to do a float test. Drop a spoonful of starter into a cup of water. If the starter floats, it is ready to be used. If it sinks, it is not ready. The floating comes from the correct amount of carbon dioxide in the starter.
What is a bulk fermentation?
Bulk fermentation (aka first fermentation or first rise) is the dough’s first resting period after yeast has been added, and before shaping. Proofing (aka final fermentation, final rise, second rise, or blooming) is the dough’s final rise that happens after shaping and just before baking. So the long bulk ferment will be apx 12-14 hours or even longer! The second “proof” will only last about 1 hour. If you have an active and healthy starter, it will be obvious as the dough rises and creates tons of air bubbles in the dough.
What is a proofing basket or banneton?
A proofing basket or banneton is a basket used to hold the dough for its final rise or proofing prior to baking. Here are some great options below:
What add in ingredients can I add to this easy sourdough bread recipe?
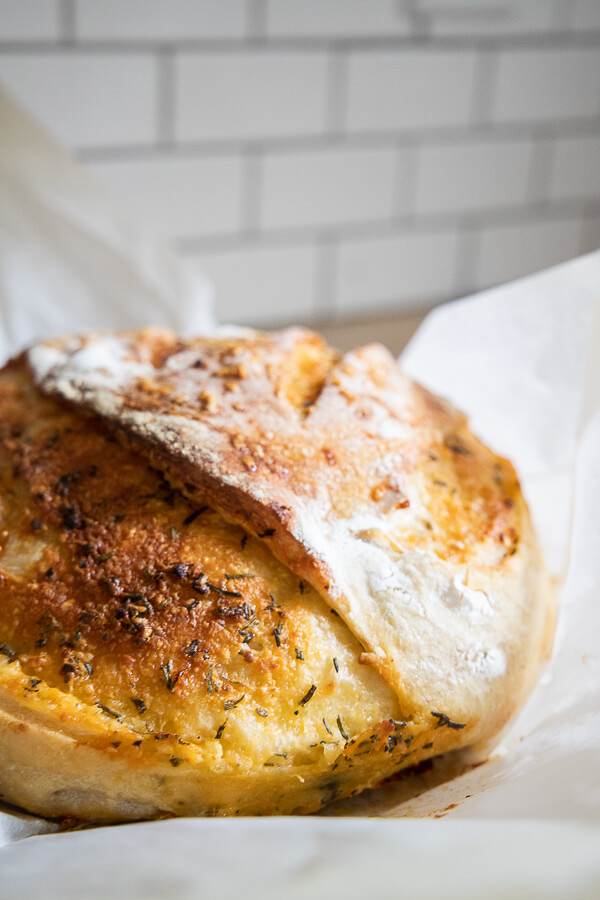
For this recipe I am adding rosemary, sage, chives, garlic, and shredded extra sharp cheddar cheese. You can also use olives, sun dried tomatoes, multiple types of cheese and so much more!
Can you use a stand mixer to mix this dough?
Yes you certainly can, but I do not think it is necessary. If you do choose to use one, you can use a dough hook to do the kneading.
Can I use a bread machine?
No, I would not recommend it. This bread is so easy to make, a breadmaker is not necessary. The only thing this bread needs is time.
What kind of flour should I use for this bread recipe?
I prefer to use bread flour which is a white flour but you can experiment with whole wheat flour, rye flour, kamut flour (I have an entire post on this kamut flour here). You can use all purpose flour but i find it does not produce as good of a loaf. I like a high protein bread flour.
What tools do I need to make this sourdough bread?
For this bread recipe you will want to have a bench scraper(dough scraper), dough whisk or wooden spoon, banneton or proofing basket, a piece of parchment paper, a razor blade or bread lame(or sharp knife), plastic wrap, and a large mixing bowl or container to bulk ferment your dough.

Check out my favorite products below:

This sourdough recipe is very similar to my dutch oven sourdough with a couple differences. This recipe has a bit of honey in it and I bulk ferment it slightly different.
How to make this easy sourdough bread with herbs, garlic and sharp cheddar cheese

Easy Sourdough Bread Recipe Step-by-Step Instructions
First thing is you need to mix up your dough. I like to do this the night before I actually want to bake the bread. You need to first make sure you are using an active sourdough starter.
How do you know if your sourdough starter is ready to be used? It should have been fed about 4 hours prior. You can also test the starter by adding a spoonful to a cup of water. If the starter floats it is ready, if it sinks, it is not ready to be used.
So, we want to mix the water and sourdough starter in a large bowl or container. I like to add mine to a 6 qt round food storage container with a lid. This gives the dough plenty of spice to bulk ferment and with the lid it keeps the dough from drying out.
Once you mix the water and sourdough starter, you can add the honey, flour and salt. I use my dough whisk to mix up the dough until it is combined. When it gets too hard to mix with that, I use my hands to continue kneading it until it is well combined.
After ten minutes, you want to lift the side of the dough and fold it over the top and push down. Do a quarter turn, then repeat this on all sides of the dough. Cover again and let the dough rest another 10 minutes. Repeat this process a minimum of 4 times, but more is better and I try to shoot for 6-7. I would recommend you using wet hands to stretch and pull the dough since this will prevent it from sticking to your fingers.
Once you are done with this, its time to let it sit and rest for 12-16 hours. I like to make my dough in the evening and let it sit on the countertop overnight. You can also do your long rise in the fridge, if you are planning to wait a while before baking the bread.
Sourdough bread has many different options when it comes to preparing the dough.
1. If you plan to mix, let sit overnight and bake in the morning, there is no need to keep it in the fridge. You can leave it at room temperature in your kitchen and let it bulk ferment until the next day.
2. If you want to mix it up and let it sit on the counter but don’t want to bake it until later the next day, you can shape and form the boule after the long rise of 12-14 hours and then put it in the fridge to slowly rise until you are ready to bake. Just remember to take it out of the fridge about 30 minutes prior to baking it.
I find these two ways to be the easiest ways to prep your sourdough.
To add different ingredients to your dough, stretch out the dough into a rectangle on your work surface and sprinkle the cheese, herbs and garlic over the top. Fold the dough into thirds and then roll it up on itself. Use your hands to help guide and shape the bowl into a round ball. Continue to do this process to build some surface tension to the top of the dough. This will give the dough a nice uniform top.
Once you have shaped the dough, set it in a proofing basket or banneton (that has been dusted with flour )with the top of the bread dough at the bottom of the banneton. If your dough is room temperature and you have done the long rise on the counter you can set the shaped dough on the counter to have its second dough rise which should take about 30 minutes to 1 hour.
While the dough is rising, preheat your oven and you pan at 425 degrees.
When the oven and the pan are pipin hot and the dough is sufficiently risen, its time to transfer it onto your pan. I like to use my dutch oven pan or my bread baking pan. You can also use traditional bread pans. Baking times will be different though.
(For a dutch oven bake) set a piece of parchment paper on the counter. Dust the paper with flour. Carefully turn your banneton over and slowly pour out the dough, revealing the top of the dough.
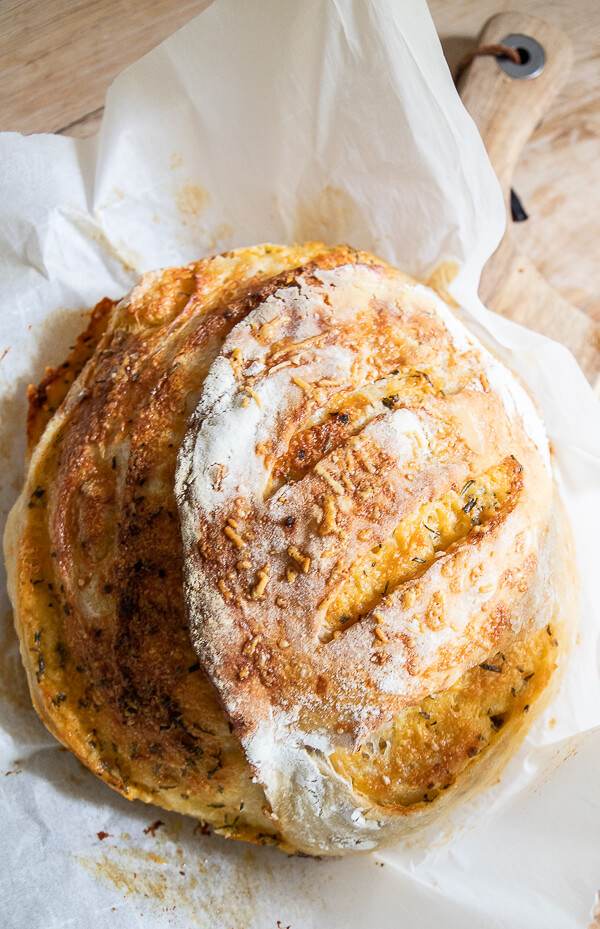
Now you need to move a bit quicker. Cut some score marks in the bread dough. I like to make one long cut along the top side of the dough (this will allow the bread to expand as it rises). You can also add more decorative cuts as well like leafs or slashes.
Carefully take the sides of the parchment paper and lower the dough into your cast iron dutch oven (I like this method because it keeps the bread form and doesn’t allow it to spread, instead it rises). Put the lid on your pot and bake it for about 25 minutes. At this point check the bread and leave the lid off so that the top can brown up and even out the color.(about another 20 minutes)
When the top is nice and crisp and golden brown, tap on the top with your finger nail. If it sounds slightly hollow it is done! Remove the bread my grabbing the sides of the parchment paper and let it rest on a baking rack to cool.
Wait until it is completely cooled before you cut the bread.
You can store this bread in an airtight container, bread bag or cover it with a towel. This bread is amazing fresh, or toasted with a bit of butter. The combination of the herbs, cheese and garlic really magnify the flavor of this bread and it tastes absolutely amazing.

Homemade sourdough is hands down the best thing ever! This recipe will make 2 smaller loaves or on large sourdough boule. Making sourdough bread is certainly an artform on its own. You can create some really pretty designs with the cuts that you make in top of the dough. I usually keep the design simple on the tops of my homemade sourdough bread, but sometimes I do more elaborate designs. Nothing is more beautiful than a loaf of bread with a gorgeous ear caramelized and a crispy crust.
The whole process of making artisan sourdough bread is like meditation. There is some form of therapy in creating and baking these loaves of bread. It feels magical being able to create bread without the use of traditional yeast.
Easy Sourdough Bread Recipe with Herbs, Garlic and Sharp Cheddar

Rosemary, Garlic, and Sharp Cheddar Sourdough Bread Recipe
Ingredients
- 1 CUP Active sourdough starter
- 1 3/4 TSP Salt
- 1 TBSP Honey
- 1 1/2 CUP Water
- 4 CUPS Bread Flour
Instructions
- Put your water and sourdough starter in a large bowl or container. Mix the two together until the starter loosens up and starts to dissolve.
- Add the honey, flour and salt and begin mixing using a wooden spoon or a dough whisk. I like to hold out about 1 cup of the flour and slowly add it at the end if I need more flour.
- Once the dough begins to combine, and gets difficult to mix, you can start using your hands to mix it thoroughly. The dough should be slightly sticky but not runny or goopy.
- Make sure the dough is well combined and then let it rest for about 10 minutes. Make sure to cover it with a lid or plastic wrap.
- After ten minutes, you want to lift the side of the dough and fold it over the top and push down. Then repeat this on all sides of the dough. Cover again and let it sit for another 10 minutes. Repeat this process a minimum of 4 times, but more is better and I try to shoot for 6-7.
- Once you are done with this, its time to let it sit and rest for 12-16 hours. I like to make my dough in the evening and let it sit on the countertop overnight. You can also do your long rise in the fridge, if you are planning to wait a while before baking the bread.
- Sourdough bread has many different options when it comes to preparing the dough.
- 1. If you plan to mix, let sit overnight and bake in the morning, there is no need to keep it in the fridge.
- 2. If you want to mix it up and let it sit on the counter but dont want to bake it until later the next day, you can shape and form the boule after the long rise of 12-14 hours and then put it in the fridge to slowly rise until you are ready to bake.
- I find these two ways to be the easiest ways to prep your sourdough.
- To add different ingredients to your dough, stretch out the dough into a rectangle and sprinkle the cheese, herbs and garlic over the top. Fold the dough into thirds and then roll it up on itself. Use your hands to help guide and shape the bowl into a round ball.
- Once you have shaped the dough, set it in a proofing basket or banneton (that has been dusted with flour )with the top of the bread dough at the bottom of the banneton.
- If your dough is room temperature and you have done the long rise on the counter you can set the shaped dough on the counter to have its second rise which should take about 30 minutes to 1 hour.
- While the dough is rising, preheat your oven and you pan at 425 degrees.
- When the oven and the pan are pipin hot and the dough is sufficiently risen, its time to transfer it onto your pan. I like to use my dutch oven pan or my bread baking pan. You can also use traditional bread pans. Baking times will be different though.
- (For a dutch oven bake) set a piece of parchment paper on the counter. Duat the paper with flour.
- Carefully turn your banneton over and slowly pour out the dough, revealing the top of the dough.
- Now you need to move a bit quicker. Cut some score marks in the bread dough. I like to make one long cut along the top side of the dough (this will allow the bread to expand as it rises). You can also add more decorative cuts as well like leafs or slashes.
- Carefully take the sides of the parchment paper and lower the dough into your cast iron dutch oven (I like this method because it keeps the bread form and doesn't allow it to spread, instead it rises).
- Put the lid on your pot and bake it for about 25 minutes. At this point check the bread and leave the lid off so that the top can brown up and even out the color.(about another 20 minutes)
- When the top is nice and crisp and golden brown, tap on the top with your finger nail. if it sounds slightly hollow it is done!
- Remove the bread my grabbing the sides of the parchment paper and let it rest on a baking rack to cool.
- Wait until it is completely cooled before you cut the bread.
- You can store this bread in an airtight container, bread bag or cover it with a towel. This bread is amazing fresh, or toasted with a bit of butter. The combination of the herbs, cheese and garlic really magnify the flavor of this bread and it tastes absolutely amazing.
Make this easy sourdough bread recipe today! You will be making it daily I promise you!

I’d be interested in hearing from those of you who have tried this sourdough bread recipe with different flours, as in whole wheat & einkorn, or a combination of other flours, too. I’m excited to try this recipe!