
How to Use the New Cricut Infusible Ink
This is a sponsored conversation written by me on behalf of Cricut. The opinions and text are all mine.
You guys, I am so excited about todays post! Its been a bit since I shared some Cricut fun and today is super fun! We are talking about the new Cricut Infusible Ink! Let me tell you this stuff is really cool! It’s a total game changer as well. So, lets get started!
Theres a lot you need to know about using the new Infusible Ink. Infusible Ink is a heat transfer ink product that Cricut recently came out with.
Here are a few key facts you need to know about it:
- The ink transfers and bonds to your fabric. It becomes one with your material.
- It is peel proof, flake proof and wash proof. Since the ink infuses into the fabric you are using, it will last for a very, very long time! Because of the permanence of Infusible Ink, it will last wash after wash!
- It stretches and moves with your fabric. You cannot feel it on top of the fabric, because it has been infused into the fabric.
- It is highly recommended that you use the fabric or other Cricut blanks that they have available.
- They have coasters, canvas totes, the softest shirts and more to come! I really love how soft the shirts are.
- I would highly suggest using the Cricut Maker to cut out your designs and the Cricut Easy Press to transfer your designs. The Cricut Maker uses more tools, which means more possibilities! It handles fabrics, leather, paper, and balsa wood with effortless precision. Since you only get one shot to transfer the design, you will want to make sure you use something reliable, and something that can get hot enough. The even heat plate, robust temperature range (up to 400°!) and portability make it the go-to heat companion for Infusible Ink. It’s advanced features ensure flawless Infusible Ink results every time.
So, lets talk about what you might need when using the Infusible Ink:
*This post contains affiliate links for your convenience*
All these supplies are available at Cricut.com or exclusively at Michaels.com!
- Infusible Ink Blanks including shirts, totes, and coasters
- Infusible Ink transfer sheets
- Butcher paper
- Infusible Ink Pens
- Heat resistant tape
- Laser copy paper(if using the pens or markers)
- card stock
- Cricut Easy Press 2
- Cricut Maker
- Weeding tools
- Easy Press Mat
Here are the steps to using your Infusible Ink, in 3 simple steps:
- Choose your material
- Make your design on Cricut Design Space
- Apply heat
These seem awfully simple, but they really are the main steps. But, there are a few technical items you need to know about, so I want to show you how I used the Cricut Infusible Ink to make a cute onesie for my new nephew and some really cook boho style coasters!
Whether you are using the ceramic coasters or the shirts, the method is the same. The only time it will be a bit different is if you are using the Infusible Ink Pens, which require the use of laser copy paper as well as heat resistant tape.
First, lets see how I use infusible ink to make super cute boho style coasters:
What you will need:
- Cricut Maker
- Cricut Easy Press 2
- Set of Cricut coasters
- Infusible Ink Sheets or Pens/Markers
- Butcher paper
- card stock
There are so many different ways to design onto the Cricut coaster blanks. I found that these were the easiest project to start off my education into infusible ink. I found the ink really easy to work with, but first I made sure to watch a couple videos that Cricut has all about their Infusible Ink. First watch this one...
Now, there are a few important steps to remember when using the infusible ink.
You have butcher paper and card stock for a reason.
First you want to create your design on Cricut Design Space. Make sure to always mirror image your design because you will place the design down on top of the coasters. For this project, I found some cool boho designs and made my own template for my coaster. You can see the collection here.
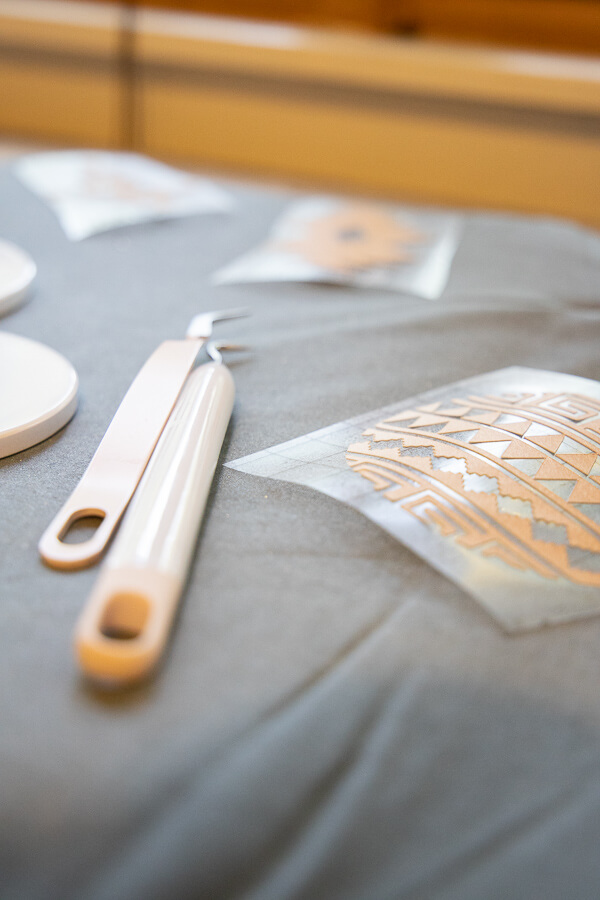
Once you have your design ready, cut it on your Cricut Maker. You will want to cut any unused ink transfer sheet, and save it for later use. You never know when you will want to use it.
Peel off the parts of the sheet that you do not plan to use, similar to any other project you do with Cricut. I cut each coaster design and separate them so that I can easily use one at a time. I used my weeding tools to get out any hard to get pieces.

Now, set up your Easy Press mat. Set the card stock on the mat to protect it from the Infusible Ink. Place the coaster on the card stock. Next place your design on the coaster carefully make sure it is straight and secured. The backing on the Infusible Ink is sticky so it will stick to your coasters.

Once they are ready you will want to make sure you turn on your easy press. You can check Cricut’s website for temperature and times, but the coasters have these on the back of the packaging. You will set it at 400 degrees F.
Turn over the coasters so the top is down. Place the butcher paper over the top of that.
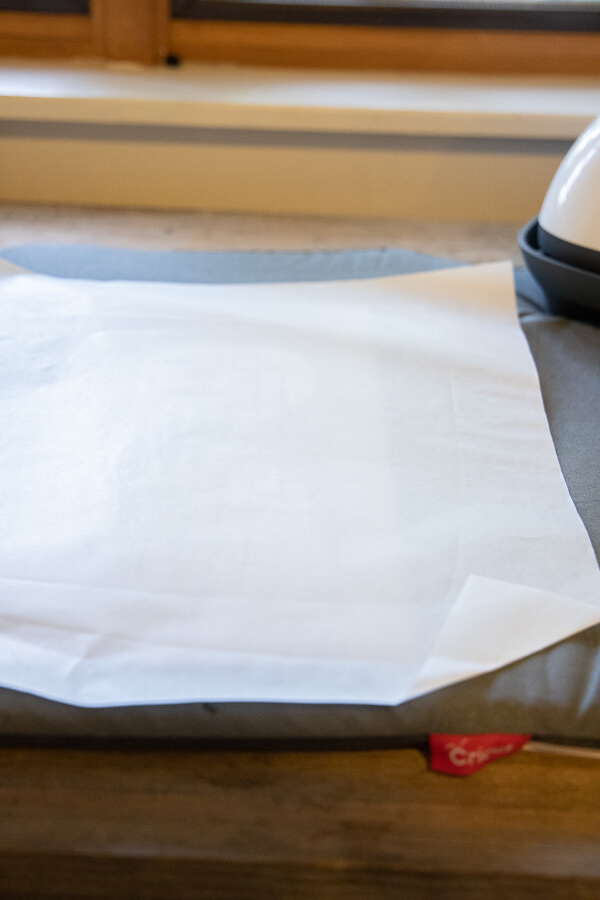
Next carefully place your Easy Press 2 on the top of the coaster and do not move it. You do not need to put any pressure on to make the coasters. Simply set the time and let it do its thing.

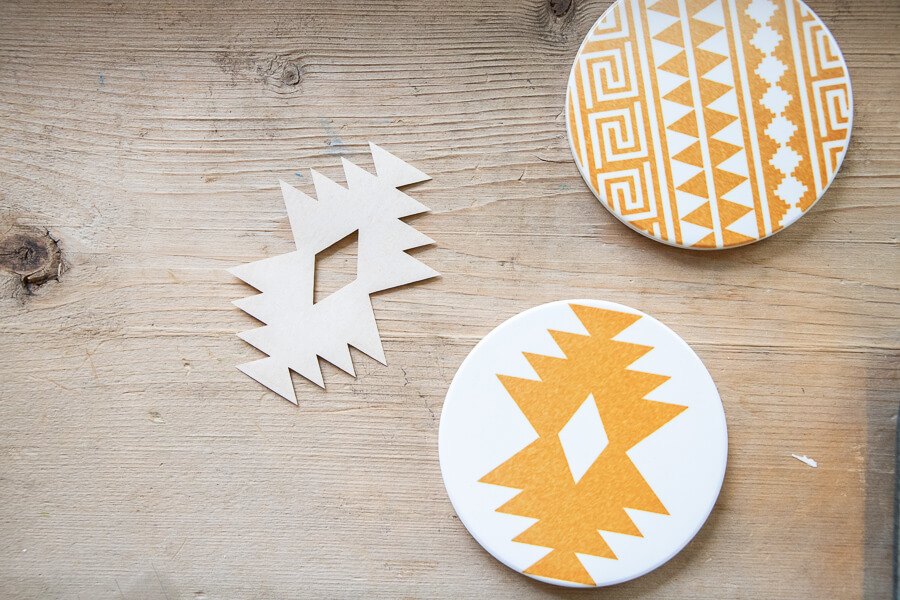
You will set the time for 240 seconds. Once the timer beeps, carefully take off the Easy Press 2 and let the coasters completely cool. They are extremely hot at this point. You will burn yourself. Once they are cooled, you can take off the butcher paper, and turn over the coaster. Carefully pull off the backing, revealing the most awesome designs!


Aren’t they so cool?
Now, lets learn how to apply the Infusible Ink to a shirt…using one of their super soft baby onesies:

Here is what I used for this project:
- Cricut Onesie
- Infusible Ink Transfer sheet in animal print
- Easy Press (large) and Easy Press Mat
- Cricut Maker
- Card Stock
- Butcher Paper
- lint roller
The first step is to create your design in Design Space. There is no difference between designing for Infusible Ink and any other Cricut product. The one thing you want to make sure you do is to mirror image the design so that it is facing the correct way once fused to the fabric.
Place the Infusible Ink topside down(where the pattern/color is) on a cutting mat.
Once the pattern is cut on the Cricut, carefully remove the unwanted portions. Save any pieces that you may seem fit for future use.
Lay out your Easy Press 2 mat and set your Easy Press 2 temperature according to the guidelines on Cricut’s website.
Here you will follow similar steps as with the coasters.
Lay your onesie or shirt on top of the mat. Add a piece of card stock to the inside of the shirt where the design is going to be applied. this will protect both the shirt and the mat from any ink.
These next steps are a bit different, so pay attention.
First you want to use a small lint roller to remove any lint of debris on the shirt. You want a nice clean shirt. Next, you want yo place your Easy Press 2 on the shirt for 30 seconds to remove any wrinkles and to pre-heat the shirt.
Once you have done this, let it cool and then lay your design face down on the shirt. Top this with a layer of butcher paper to protect the shirt from scorching. Follow Cricut’s guidelines on time and temperature for these, which is at 385 degrees for 40 seconds. You want to make sure you carefully set the Easy Press 2 on top of the shirt, and be sure not to move or bump the press.
Set the time and give even pressure to the top of the Easy Press 2 by placing your hand on the handle and pressing down slightly.
Once the timer beeps, carefully remove the Easy Press 2. Let the shirt cool before taking off the backing.
Once you take off the backing, your shirt is good to go!
Voila, a new shirt using Cricut’s Infusible Ink!

I made this cute onesie for my new nephew. I had some really fun animal print Infusible Ink that I used for this. You can see this design here.
Isn’t it cute? I love how soft it is, and how the design infuses into the fabric of the shirt.
So, what do we think of the new Infusible Ink by Cricut? I love it. I did find it had a bit of a learning curve, and its nice to practice on a small piece of fabric, which I got inside my Infusible Ink package. This way you can work out any kinks before you make the real thing. Despite the learning curve, once you figure it out, the possibilities are endless.
I love that this feels soft to the touch, there are no lines or funny business. It lays so nicely, without any bunching or flattening out.
This is a really great product in my opinion and cannot wait to see what other materials they come out with to create on.
There are so many options and ideas of things that you can do with the new Infusible Ink.
Check out these other great Cricut posts:
10 Things to Know About the Cricut Maker Machine Before You Use It
Complete List of Materials You Can Use with the Cricut Maker
How to Use Cricut Pens to Make Custom Printable Artwork
How to Use the Cricut Easy Press 2 Like a Pro!
A Whole New Way to Create, A Cricut Maker Review
Make sure you share this post with others!

Comments submitted may be displayed on other websites owned by the sponsoring brand.