
How to Use Cricut Pens to Make Custom Printable Artwork
This is a sponsored conversation written by me on behalf of Cricut. The opinions and text are all mine.
Its been about 2 months since I started using my new Cricut Maker and I am so thrilled with how much fun it has been to use. I have been using a lot of the features of the Cricut Maker, but today I want to show you how I used the Cricut Pens to create easy custom hand drawn printable artwork.

I love creating printables for my readers, but today I want to show you something a bit different. What I want to show you is how I use the Cricut Pen to create cute, hand drawn artwork for my home. The possibilities are absolutely endless!
While I usually use different software to create my printables, I was really excited to see if I could use my Cricut Maker to create a printable.
Now, when I say printable, I am not actually using it in the traditional sense of creating something online and printing it off. I am talking about creating something on Cricut Design Space(Cricuts design software) and using one of the Cricut Pens to create something truly custom.
When I found out that you could use a pen/calligraphy pen/or markers with the Cricut Maker and that it would draw your design…I was absolutely flooded with ideas. Since it is springtime here, I thought I would create a couple of cute hand drawn designs.
Lets talk about the process of creating the design for my hand drawn printables:
- Create a new project on Design Space
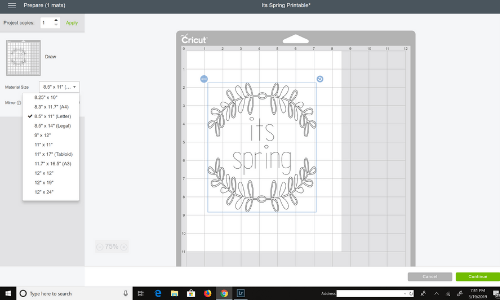
- The first thing I wanted to do was to create a rectangular shape that would represent my printable paper size. I was creating a printable that was 8.5 by 11. I made sure to get the size of my rectangle that exact size. This will act as a paper template. I will delete this before I finish the project. It is just there as a helpful guide to make sure that the design is sized right for the paper.

- Next, you want to create your design. I chose a cute font, and made sure that I selected that it was going to be drawn and not cut. I did the same with the leaf design I chose. I was able to select the draw setting. This will prevent it from cutting instead.

- I made sure to center the design on the paper template. Once it is where I want everything to be, I selected all the layers to the right and grouped them together.
- Then I right clicked over the image and selected “attach” which ties the layers together.

- Once I was at this point I was ready to use the Cricut pen to create my design. Before I did that, I deleted the rectangular shape in the background so that it was not included in the design

- When you click “Make It” you will have the option to change the paper size. I choose the 8.5 by 11 inch paper. I then was able to move the design around until I had it centered just right on the paper.
Now, you can click continue and follow the prompts of the Cricut Maker. It will ask you to select the material, and then it will tell you to load the Cricut Pen in the Clamp A.
You can watch this video below to see the Cricut Maker design my printable with the Cricut Pens….it is so cool!
Now there are a few things to remember when making a custom printable with the Cricut Pens.
- First, you want to make sure that you choose a font or design that can be drawn. Most design can, and there are a ton of fonts that have the option to be drawn. I made it easier by using the filter to select only fonts that can be drawn.
- When you choose your image, it will begin looking a bit different. It will likely be filled with color, since it is defaulted to be cut. Once you select to draw it, you will see what it will look like when it is drawn. Try to find something with some detail, since the detail will most likely be present in the drawing setting and it looks really cool!
- Make sure that your design fits into the size of paper that you want. That is why I added the rectangular template that acted as a piece of paper.
- Once you are ready to “make it” make sure that you select the appropriate sized paper and then arrange your design to where you want it.
- Last, remember to “group” your layers and “attach” them together. Otherwise they will be laid out separately on the paper and not in the design you planned.
What I loved about using my Cricut Pens to create custom printable art:
- You do not have to be an artist or someone that is good at hand lettering to create something that looks real and authentic.
- Since it is actually created with a Cricut Pen or marker, it has the look of being real, hand made art. You can totally fool those that see it! Let them think that you can do that!
- There are limitless possibilities. I can see this being something I use all the time. Every season, even creating simple artwork for my kids rooms using images from Cricut and having them drawn on paper.
- You can use the many different colors and styles of Cricut Pens to give your designs interest and texture!
So, lets check out my new spring “cricut drawn” printable artwork, made with the Cricut Pens!

I started by creating two that are spring inspired! I love the funny spring quote from the first one….because really…this winter just keeps dragging on and on and I really should not be held accountable for what I have said anymore!

I love that they were written out on the Cricut Maker with the Cricut pen…its so cool! I love watching it work!

Such fun detail, am I right?

I really think that this one is adorable. The thing about changing the images to a drawn image instead of a cut image is that it has so much more detail and design that you don’t see when its in its cut form.

Its spring all! I sure hope it is…but who am I kidding, I am sure it will be winter again next week.
So, are you interested in making these printables on your own cricut? Check out my links below that take you directly to the design:
***NOTE these are not regular printable files, this is only usable if you have a Cricut Machine and use Design Space. These are not PDF or JPG files.. This will take you to Design Space where you can then “make it”
SO FUN….
That is all I have to say about this project today. If you are a beginner Cricut Maker user like I am, these kind of projects are a great way to dip your toe in and really learn how to use the machine for yourself. I love this machine and I cannot wait to make so many more projects.
Have you used the Cricut pen for any of your projects?
Check out some of my most recent Cricut Projects here:
How to Use the Cricut Easy Press 2 Like a Pro!
A Whole New Way to Create, A Cricut Maker Review
How to Make Easy Horse Art with the Cricut Maker
Make sure to PIN IT for later! Share this post with your friends on Pinterest and Facebook!

I absolutely loved this post! The step-by-step instructions on using Cricut pens for custom artwork were super helpful. I can’t wait to try out the techniques you shared. Thanks for the inspiration!