
How to Paint Furniture Like a Pro The Easy Way
How to paint furniture like a pro!
Have you ever had an old dresser. from a thrift store or other piece of furniture that you didn’t know what to do with? Well, this seems to be the story of my life! I can’t help but have a soft spot for those none to pretty pieces of furniture. I really have to talk myself out taking each one of them in. Painting old unwanted furniture is one of my most favorite pastimes, and today I am going to show you how to paint furniture like a pro with helpful step by step instructions!
I am so excited about this post today! This is something I am always asked about! So, I thought it was time that we sat down, had a chat, and really got into how to paint furniture. So, lets get down to it. I’ll be talking mainly about one piece of furniture for the most part…but I use this same method on all of my projects.

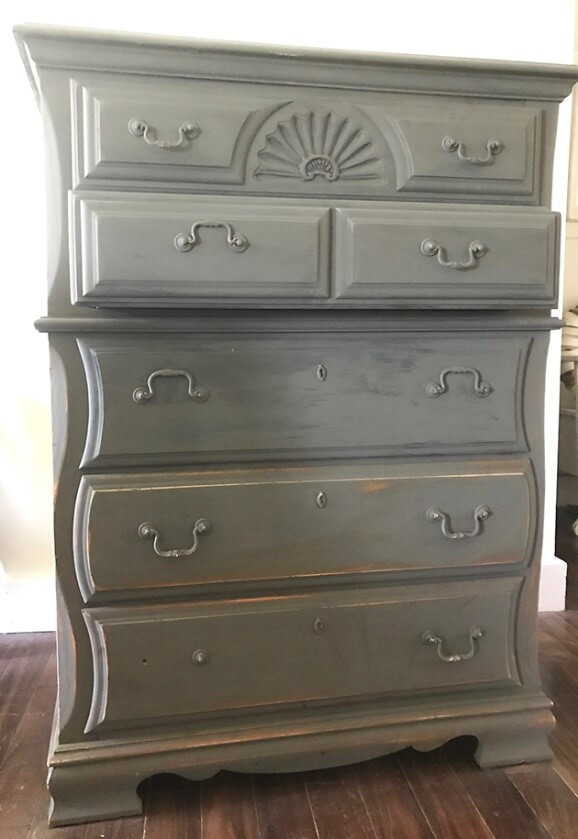
I had this hand me down dresser that had been sitting in my closet for the past 10 years and it needed a little love. At one point, I had started to paint it once but changed my mind, so it sat in this condition for a while. I find myself avoiding these kinds of projects until I know exactly what I want to do.
It all starts with the a few decisions. First thing, what paint color do you want? What kind of paint do you want to use?
- Now, the first question is all yours. What color of paint do you want to us ? I tend to lean more towards whites, and other neutrals. For this piece of furniture, I actually chose a charcoal color, but this choice is completely up to you. You could either compliment other pieces of furniture with the same or a coordinating complimentary color.
- The next decision is what type of paint to use and what paint finish as well: Some of the most common types of paint used are: latex (water based) paint, chalk paint, milk paint, and enamel paint. If you choose a chalk paint or milk paint, you will have more of a matte finish before you apply a wax or poly-acrylic. If you choose an acrylic paint, you can choose from a matte finish, satin finish, semi-gloss, or gloss finish.
Lets talk about the different kind of paint there is to use:
- Chalkpaint- Chalk paint is a type of paint that can be used on furniture and other items to create a chalky appearance. It’s used for creating an aged appearance, and can be distressed easily. I love using chalk paint. It is very forgiving and easy to work with especially if you are a newby painter. Want to learn how to make your own chalkpaint? Check out this post!
- Milkpaint- Milk paint has been used for centuries. It is different than chalk paint and has a much thinner consistency. The main ingredients are milk (or quark) and lime. Usually this paint starts out as a powder, which you add water to. I have found some that is already mixed that has worked well too. You will end up using at least 4-5 layers of paint since milk paint is so much thinner. But this paint is beautiful and creates unique and gorgeous pieces of furniture.
- Acrylic paint- What I am talking about here is the regular old paint you buy at the hardware store. The kind you use on walls and ceilings. It is entirely okay to use this kind paint to paint your furniture. I have used it many times. I have also used it to make my own chalk paint. I would advise you to use a satin or eggshell finish if using this kind of paint. You will need to use a primer or make sure that the surface is free of lacquer/sealer so that the paint will adhere better.
- Fusion mineral paint– I have used this before and love it! Using natural rather than synthetic pigments allows for greater depth in color and better durability to UV light and time. Once cured, a surface painted with Fusion™ is both water and stain proof. No primer or top coat is required, making it more of a one-step kind of paint. You can read more about the difference of mineral paint and chalk paint here
I have used all 4 of these paint products and honestly really like all 4. For this project, I used milk paint. Even with just milk paint, there are so many different options. For this project I used Folk Art Milk Paint, since it was a sample they had sent me, I wanted to try it out.
With both chalk paint, mineral paint, and milk paint, there is less prep, since the paint is great at sticking to most surfaces better. With a latex paint, it is recommended that you sand and use a primer to prepare the surface.
I did not have to do any prep other than a little cleanup.
(if you want to paint with a paint sprayer for a more professional finish, check out this post here)
So before we start, lets talk about the supplies I use for painting furniture:
- Zibra Paint Brushes or other good paint brushes
- Milk Paint, Chalk Paint, mineral paint or any other kind of painted you choose (I used Folk Art Milk Paint in Plymouth Rock)
- Sand paper
- Clean cloth
- Primer(depending on what paint you choose, mainly for latex paint, also milk paint does need a milk paint primer depending on the finish of your furniture. If it is still sealed, it needs a primer)
- Finishing oil (for milk paint), wax or poly-acrylic for chalk paint
- Floetrol ( an additive that you can add to
What to do before you paint your furniture:
You need to find a good place indoors or outdoors to paint the piece you have chosen. Lay down drop cloths or some plastic cloths and set your piece of furniture on it. You want to prep whatever you are painting by filling any holes or cracks with wood filler, and for best results sant these down and wipe down with a damp cloth.
How to Prep the Surface Prior to Painting
Before painting any piece of furniture you need to make sure you prep the surface. The prep work is the most important part of the painting process. If it is not prepped correctly you may get peeling paint or other issues.
It is important to consider what the original finish is on the furniture piece that you want paint. Depending on the original surface, your prep might be a bit different. If the furniture has an oil based finish, using a strong primer is key. I like the Kilz primer that will stick to just about any surface. But it also depends on what kind of paint you want to use as well. Whether you sand the entire piece, add a coat of primer or liquid sandpaper, or do nothing but wipe it down…this is entirely up to what you want out of this piece of furniture and what type of paint you are applying.
I would highly recommend giving your furniture a good sanding prior to painting. You will also want to clean the furniture thoroughly use a product like TSP cleaner.
Once the piece is clean and dry and prepped by sanding, its time to paint.
If you really want good adhesion of your paint, I would recommend painting a coat of primer first, letting this dry. If you are using chalk paint, mineral paint, or milk paint they are really good at adhering to a finished surface and allow you to skip this part of the process. I still prep the surface by cleaning it and making sure it is all in good shape.
What kind of paint brush should you use to paint old furniture?
I love my Zibra Paint Brushes, and have used them on so many different projects, so that is what I am going to talk about. This company has some really great paint brushes and I love the smooth finish I get by using them.
You can also use a small foam roller to paint furniture since you will not have as many brush strokes with it.
How many coats of paint should I apply?
This will depend on the thickness and pigment of your paint. Usually 2- 3 coats are the happy spot. If you are using a white paint, you generally will need a couple ore coats to cover the wood furniture. When I start painting a piece of furniture, I like to paint in thin coats, to provide an even finish as well as prevent drips. The first layer always makes you second guess yourself, and the furniture will not look very pretty. Keep going though, it will turn out. Use long smooth brush strokes, trying to keep it even. I find thin coats work much better than one thick coat which could end up with a very uneven finish.
Start by painting the edges of dresser, where there is extra detail. I work on the detail first…then I work on the horizontal surfaces.
After I paint the top of the dresser, I will go back and check the detail work to make sure there isn’t any excess paint drips.
Next, I painted the sides and the front of the dresser. I made sure to check and recheck the detail work to make sure that there is no excess paint that was added.
I like to paint the dresser drawers last. Instead of taking the completely out of the dresser, I pull them out slightly and paint the drawer fronts. I don’t usually paint the insides of the drawers, since they wont be seen…AND…because it will add an odd layer of paint on the inside that you don’t need to worry about. I think unless your goal is to create something really cool inside the drawers, I would not worry about them. They can be a great place to add some custom patterns or colors, but I tend not to do that kind of design. I also made a decision to paint the hardware along with the furniture. This isn’t done often, but I love doing it with certain pieces.
After your first coat of paint is done, let it dry completely. Once it is dried, it is time to use some fine grit sandpaper to give the first coat a smooth surface. Make sure to wipe the entire piece down and then you can start your second coat of paint. Remember to let the individual coats of paint dry completely before applying the next coat or you will get a gummy mess with uneven areas. When you are happy with the finish, take a break and let the entire piece cure for about 12 hours (ideally).
How to distress your painted furniture:
Once the furniture is painted completely, I like to distress much of my work. Sometimes I will leave it crisp and clean, but, especially with milk paint and chalk paint, it lends itself to a more rustic and distressed look.
There are so many different ways to distress furniture, and you can see how I distress furniture over here in this post. I have a full video all about distressing furniture.
When I decide to distress a piece of painted furniture, I generally use a sanding block. The sponge sanding block is really nice, because it has a more squishy feel to it, and can lend to an easier distressing job.

The key places to distress would be the obvious places that would be rubbed and worn over time. The edges of drawers, and the corners of the furniture.
This is where I focus for the most part. I like to sand a bit, and then stand back and see how it looks. See what parts may need a little bit more sanding.
Once you have sufficiently distressed the piece, it is time to seal it. If you paint with latex paint, sealing isn’t necessary in my opinion.
When using chalk paint and milk paint you need to seal your paint. You can either use a furniture wax or seal with a poly acrylic. I actually like to seal with a polyacrylic, because it’s much easier. Wax requires to be painted or rubbed on, left to dry and then buffed off. It requires a lot more elbow grease. And who wants that? I try to avoid the hard stuff.
If you use a clear wax or a dark wax, you can use a wax brush to apply. This is probably the best way to do it. I have used both a wax brush as well as a lint free cloth.
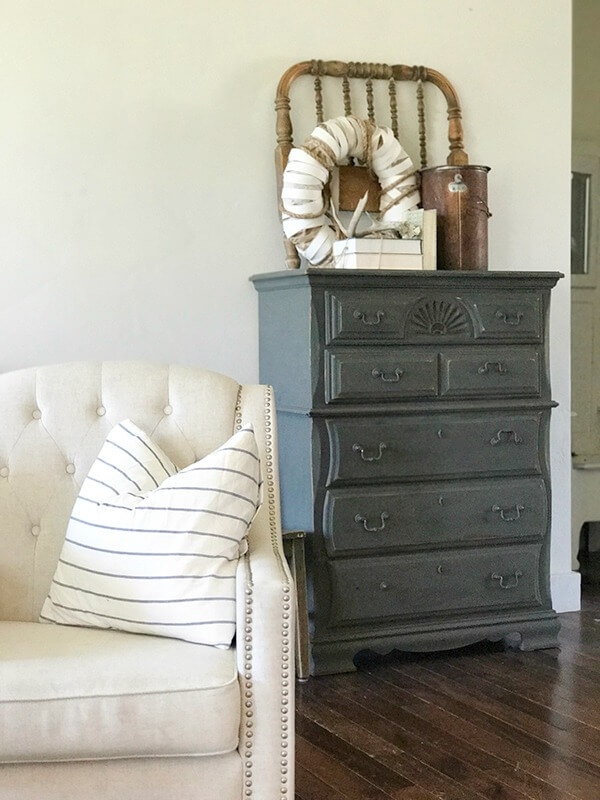
Now that its painted, sanded, and sealed, it is time to get accessorizing. That really is my favorite part. Your old piece of furniture gets a new look, with the new paint and a protective finish it has a new life! I love furniture painting, and I think its a great way to give an old piece of furniture new life. I always say, paint is so easy to change. Its a more inexpensive way to give your home a fresh update.;
There are so many ways to decorate and accessorize pieces of furniture. Check out how I style coffee tables here:
5 Elements to Decorate A Coffee Table Like A Pro
Here are some styling tips here:
How to Style Decorative Wall Shelves Like a Designer
I hope that these tips are helpful and that they help you tackle a project of your own! This is a skill that is worth learning! I love painting pieces of furniture for so many reasons…the biggest being that you can take something unloved and give it a new life with your stamp on it.
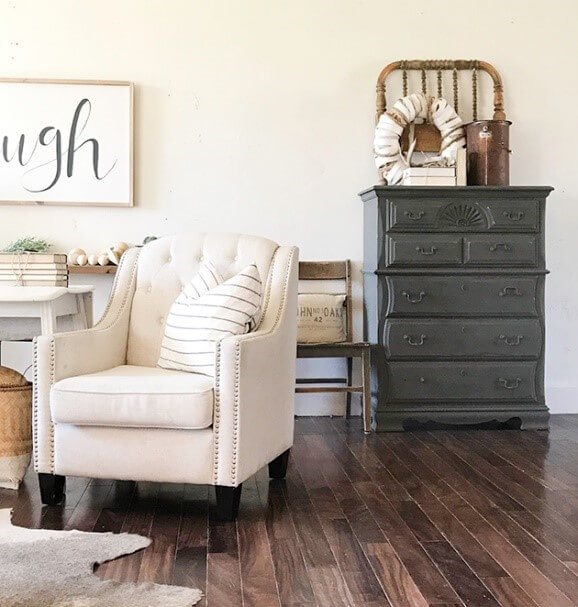
This dresser turned out pretty great!
I hope you check it out! It was a really fun project and guess what? It was really easy too!
Make sure you save this post and share it with your friends by pinning it!

If you are looking for other fun DIY projects, check out these others:

12 Quick and Easy DIY Projects for Beginners

Easy DIY Bike Rack | 10 Minute DIY

DIY Ladder Nightstand | Trash to Treasure

DIY Faux Beams | One Room Challenge Week 4
Hope you have a great week! Like always I am so glad you are here! I hope to hear from you and see you again!
You are amazing, really! Thank you for the ideas!!
What is the real color of the dresser? It looks grayish to me.
Thanks, looks real nice.
Great tips Sara! And the dresser is beautiful ❤️