
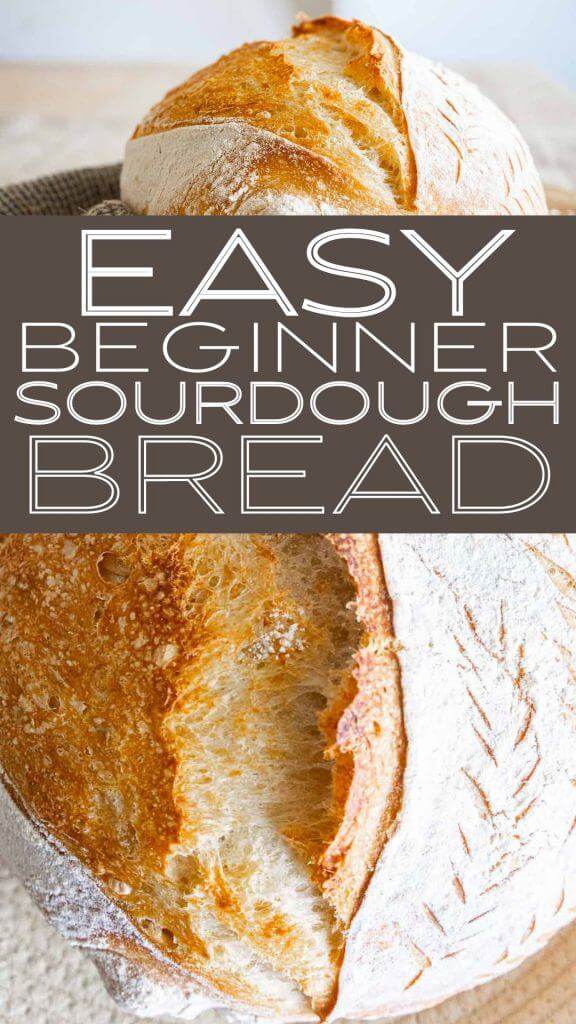
Easy Beginner Sourdough Bread Using A Dutch Oven
I am dying over this bread. It is the yummiest, and most versatile and easy sourdough bread ever! This sourdough bread is easy to make, with less than an hour of active work, and the reward is just about the most gorgeous and most amazing bread I have eaten in a long time. I would consider this an artisan sourdough bread as well, I promise you will love this. I also call this dutch oven sourdough bread because it is baked in a dutch oven.
Baking in a dutch oven allows for more steam to help with the rise of your bread, and makes an all around better bread!
NOTE: I HAVE UPDATED THIS POST WITH A MORE RECENT RECIPE, WHICH I HAVE BEEN WORKING ON FOR THE PAST YEAR. THE HYDRATION OF THIS BREAD IS HIGHER WHICH RESULTS IN A LIGHTER LOAF, AND A SLIGHTLY MORE STICKY DOUGH. IT IS STILL AN EASY BEGINNER SOURDOUGH BREAD!
IF YOU WANT A LESS STICKY DOUGH, YOU CAN ADD ABOUT 50 GRAMS OF FLOUR AT A TIME UNTIL YOU REACH YOUR DESIRED CONSISTENCY. THIS BREAD IS A 70 PERCENT HYDRATION LOAF.
When I say this is easy sourdough bread, I mean this is the first type of bread I recommend making. It is kind of the classic sourdough loaf, and there are hundreds of ways of making a loaf like this. The most important ingredient in this kind of bread is TIME. The bread dough, with the sourdough starter needs time to develop and strengthen to create your amazing bread.

Now, when I say these things you can believe me. You see, I was never really a fan of sourdough bread. Honestly, I thought it was gross. It always had a strong flavor that just didn’t sit well with me. But, that was before I started making it for myself.
The thing about sourdough is that the bread flavor is dependent on how long the bread ferments, and how sour the sourdough starter is to begin with. My starter isn’t very sour, which makes for a very pleasant flavor.
Im still amazed daily that I have harnessed wild yeast and can create so many different foods for my family using it.
LEARN HOW TO MAKE A SOURDOUGH START
FROM START TO FINISH, FAQ’S, LEARN ALL THE THINGS ABOUT SOURDOUGH!
There is also that tendency to fall in love with those things you make. The time spent working with the dough, spending quiet moments kneading and caring for it. It really can become such a calming time. You can fall in love with your food during these times. When you create a gorgeous loaf of bread, you literally cannot wait to eat it.
This homemade sourdough bread, or sourdough boule (ball) is simply scrumptious.
Yes, I may be getting a bit excited about a loaf of bread. Baking for me is one of my escapes. I love to create, build, and DIY but I also love to bake and to cook. Creating in the kitchen is equally as satisfying to me as DIY is. Bread baking is my therapy.
This dutch oven sourdough bread takes time, lets talk about how to plan it out:
Let me stress that this bread does not take a lot of effort or work, but you just need to plan when you are going to make it. It is all about the timing. Once I figured that out, this was one of the easiest breads to make, but there are a couple times when it needs time to sit and rest.
Let me explain.
You want to make sure that your sourdough has recently been fed and that it is active for this sourdough recipe.
How do you know if you have an active starter and ready to be used?
Let’s do a float test. Get a small cup of water, and drop a small dollop of your sourdough starter in the water. If it floats, it is ready to be used. If it sinks, it is not active and needs to be fed.
If this happens, feed your starter and let it sit for about 3 hours. It should be good and active by then. You can test it again, but if it is rising and falling, you are good to go.
Now, once you are ready to make your bread, you need to know that it needs anywhere between 4-6 hours on the counter and then another 12-24 hours in the fridge before baking.
Let me give you the timeline that I use.
I get my sourdough active and begin to make the dough around 2 pm in the afternoon. This is a time of day when I am home so it works well for me. The reason is that you need to give your dough some attention for about 1 hour. That is all.
How do you make the dough for this dutch oven sourdough bread?
I will take you step by step on how to make this dough and how to make this amazing bread.
YOU CAN ALSO WATCH THIS VIDEO BELOW TO SEE EXACTLY HOW I MAKE IT:
- Put your bread flour, ( you can use all purpose flour but it does not make as good of a loaf) water, sourdough starter in a large bowl. Mix it with a wooden spoon or dough whisk until it is combined. Once it is combined, its time to get your hands dirty. Use your hand to fully combine all the flour, water and sourdough. Let the dough then rest for 1 hour. This is the autolyse phase. This will allow the flour to absorb all the water and let it all rest.
- Once the hour is over, add your salt and mix it into the dough by hand. Cover the dough and let it sit for 30 minutes.
- After 30 minutes you will start your stretch and fold or coil folds. This is developing the gluten. The step is optional but I highly recommend it.
- Now you will do your first stretch and fold or coil fold. There are two different options. You can stretch and fold which means you pull the dough up from one corner and stretch it and then fold it over the top fo the dough, rotate and do the same action 4 times for the dough. Coil fold is where you lift the dough from underneath with two hands, pulling the dough up and then folding it down in half on itself as you let it back down. You then rotate the bowl and repeat this 3 more times rotating the bowl each time.`
- Let the dough rest another 30 minutes and repeat the coil fold or stretch and fold. (having wet hands makes this so much easier)
- Repeat this 3 -4 more times. You can do it up to 6 times.
- Once you are at this point you will notice the dough has a very different texture and should be very jiggly.
- After you have finished kneading it, it is time to let it sit on the counter or in a warm spot covered with plastic wrap for anywhere from 3-6 hours. This is the bulk ferment. Let the dough rise. You want the dough to double in size. It may even reach the top of the bowl. Mine usually takes about 6 hours.
- Once it has doubled in size, it is time to shape your dough.
- Do one last coil fold and then you are going to shape it into a ball. You are going to flip it over so that the finished top part of the dough is up. You are going to create tension by pulling the dough ball towards you while rolling it under. This gives the builds up the outer layer.
- Let the dough sit and rest for a couple minutes while you prepare your banneton basket,(proofing basket) or bowl. I use a bowl because I haven’t gotten a basket yet. But you will want to put a towel in the bowl, and make sure to give it a good dusting of flour. so that the dough wont stick to the towel.
- Place dough in the bowl with the smooth side of the dough down.
- Cover with plastic wrap and put a rubber band or something to secure the plastic wrap to the bowl. Put it in the fridge and let is sit for anywhere from 12-24 hours. This is the long fermentation process.
- This is where my timeline comes in handy because it will be evening by this time and you can put it in the fridge overnight. It will be ready to come out in the morning or early afternoon to be baked. You can leave it even until the next evening.
- I usually leave mine in the fridge until about noon and take it out.
- Turn your oven on high heat of 450 degrees and put the cast iron dutch oven in to preheat. When the oven is ready its time to get your bread dough ready for the oven.
- Take the dough out of the bowl and lay it seam side down this time on top of a piece of parchment paper.
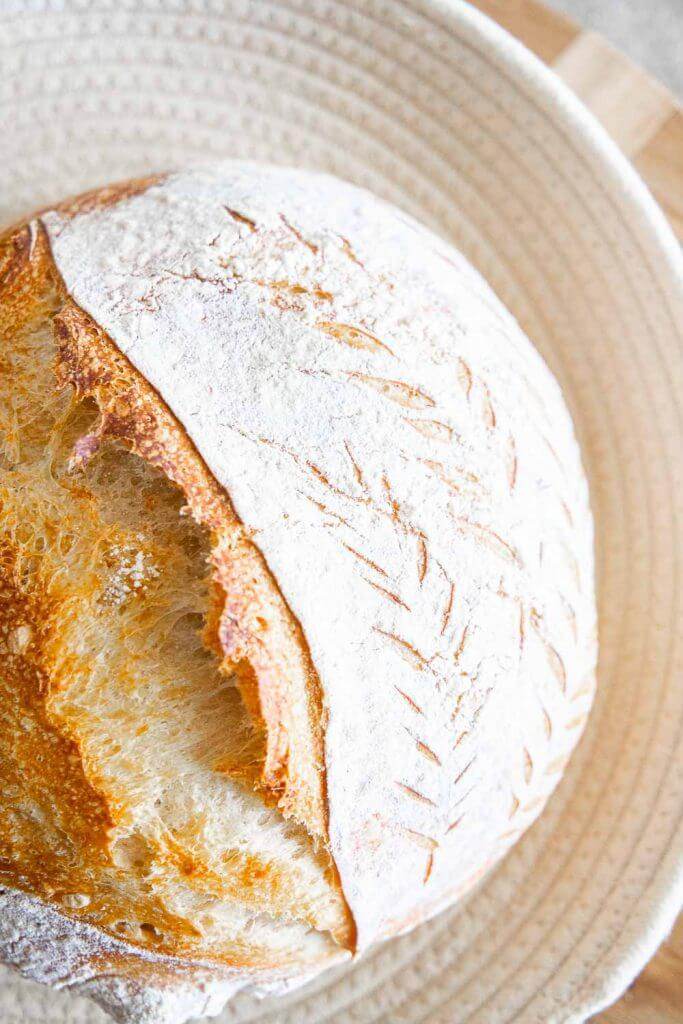
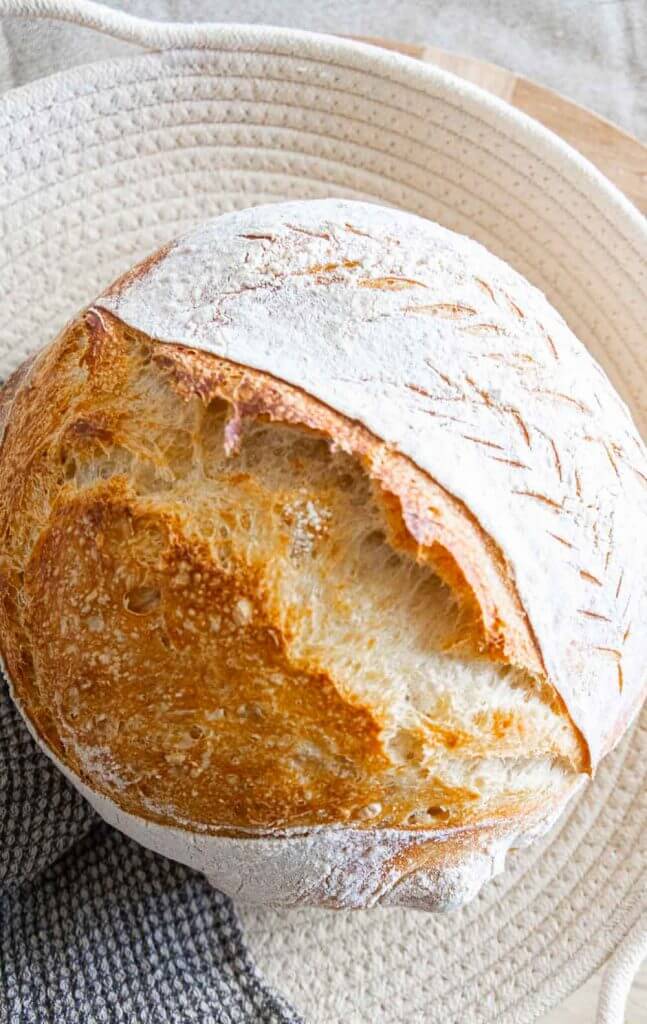
- Pull the towel off carefully. Sometimes it can stick a bit. I have found wheat flour or rice flour to be the best because it does not absorb as much. Rub some flour over the top of the sourdough loaf. This will make it easier to cut and score the bread.
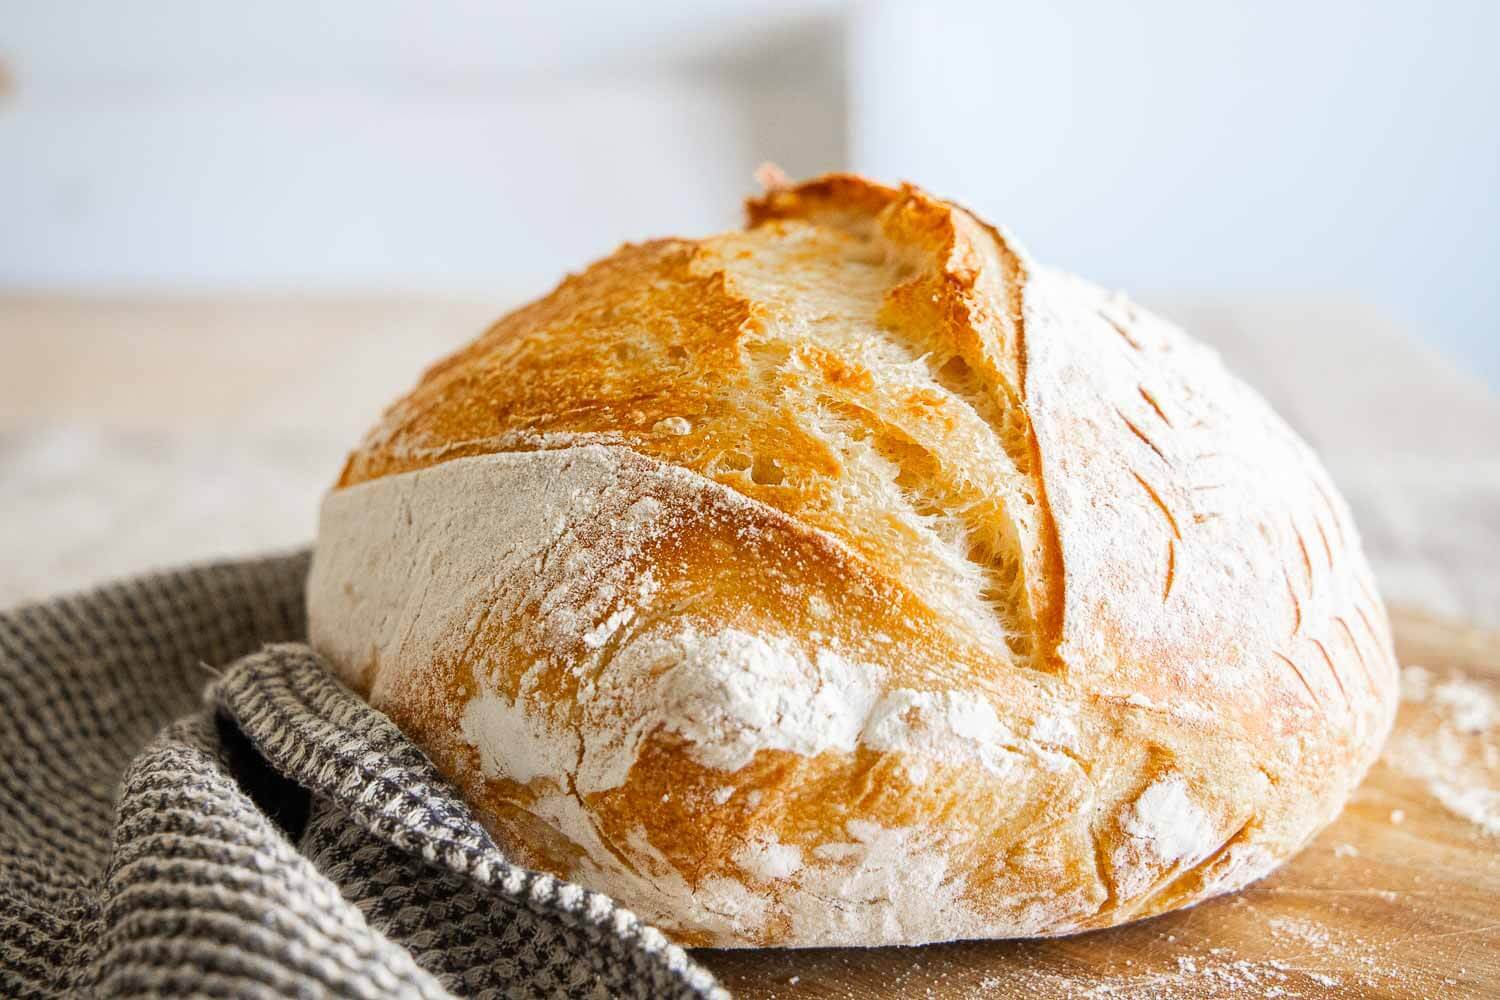
- Use a bread lame or sharp knife to score some designs or slits in the top of the loaf so that it will rise even more, plus it makes it look pretty~ I like to do a swirl pattern
- Take your preheated dutch oven out of the oven and lift off the dutch oven lid. Pick up the dough by the parchment paper and carefully set it in the dutch oven. You can place a couple ice cubes between the parchment paper and the dutch oven to create steam inside the pan. This will help the bread rise even more. It is a good idea!
- Put the lid on the pan and put it in the oven to bake for about 40-55 minutes. I like to check it after about 25 minutes and see how things are going. If it is looking more done on the bottom you can leave the lid off and let it a bit more golden brown on top. I like to finish the last 15-20 minutes with the lid off.
- Take the bread carefully out of the hot dutch oven using hot pads. I like to grab the parchment paper and pull it straight up and out. Let it cool completely on a rack.
- Enjoy it as toast, dip it in balsamic vinegar and oil, french toast is amazing, and so much more.
Want to learn more about scoring your sourdough bread? Check out this post!
Tons of tips and over 20 creative scoring patterns!
TOOLS YOU’LL NEED


This easy sourdough bread has an amazing crust, with a soft pillowy center. You can push down on the bread and it will spring back up. It has amazing structure.
WANT OTHER GREAT SOURDOUGH RECIPES?
More Sourdough Recipes


GET THE ENTIRE DUTCH OVEN SOURDOUGH BREAD or SOURDOUGH BOULE RECIPE HERE:
Easy Beginner Sourdough Bread
Ingredients
- 625 grams white bread flour about 4 cups
- 100 grams active sourdough starter about 1 cup
- 10 grams salt about 1 3/4 teaspoon
- 450 gram water about 1 1/2 cup
Instructions
- Take your sourdough start, water, and flour and put them in a large mixing bowl. Use a wooden spoon or dough spoon to mix the ingredients together.
- It will begin to be too sticky and dense to manage with a spoon. Mix with your hand until it is completely combined. Let this sit for one hour. This is the autolyse stage. Once the hour has passed you will add the salt and let it sit another 30 minutes.
- Now you will do your first stretch and fold or coil fold. There are two different options. You can stretch and fold which means you pull the dough up from one corner and stretch it and then fold it over the top fo the dough, rotate and do the same action 4 times for the dough.Coil fold is where you lift the dough from underneath with two hands, pulling the dough up and then folding it down in half on itself as you let it back down. I You then rotate the bowl and repeat this 3 more times rotating the bowl each time.`
- Let the dough rest another 30 minutes and repeat the coil fold or stretch and fold. (having wet hands makes this so much easier)
- Repeat this 3 -4 more times. You can do it up to 6 times.
- Once you are at this point you will notice the dough has a very different texture and should be very jiggly.
- Once it had doubled in size, its time to shape your dough and prepare it for the fridge! This will make one large loaf or two smaller loaves. This could take anywhere from 3-8 hours to bulk ferment.
- Form a ball, first by rolling the dough in on itself. Then flip it over and use the countertop to create tension. Push on the dough ball while rolling it under. You want to turn and roll. You can watch my video to see how to do this. This creates tension on the dough surface and gives it that good crust.
- Let the dough sit and rest for a couple minutes.
- While it rests, its time to get a bowl ready. You can use a regular large mixing bowl, but it is recommended to use a bread banneton proofing basket.
- If you use a bowl, line it with a towel, and flour the towel heavily to prevent the dough from sticking. I like to use wheat flour for this because it tends to not absorb into the dough.
- If you use a bread banneton basket, flour its heavily as well.
- Take the dough and lift it up, flip it over and put the finished side of the dough down into the bowl. Cover with plastic wrap and use a rubber band to secure the plastic wrap around the bowl.
- Put the bowl in the fridge and let it sit in there for at least 12 hours. You can go as far as 24 hours.
- When you are ready, take the bowl out of the fridge and let the dough sit on the counter for about an hour. I like to let the oven preheat to 450 degrees while this is happening. Put your dutch oven in the oven to preheat with the oven. You want your pan to be hot.
- Lay out some parchment paper, and take the dough gently out of the bowl and flip it over so the smooth side of the dough is on top. Lay it on the parchment paper
- Cut some slits or designs in the dough to allow for more of a rise. Make sure to cut a long deep cut across the length of the dough, either in the middle or to one side. You can use a scoring lame or a sharp knife.
- Immediately take your hot dutch oven out of the oven and take hold of the parchment paper with the dough. Put it inside the dutch oven and carefully place the lid on and put it in the oven to bake.
- If you want, you can add a couple ice cubes on the outside of the parchment paper between the pan and the paper. This will give the crust a bubbly surface and allow more of a rise!
- Bake the dough for 35 minutes. Check around 30 minutes and see if it is done. Tap it, it should feel hollow. You can take the top off of the pan and let it bake if the top is not golden brown. Cook with the top off for another 15-20 minutes.*If you make two smaller loaves your baking time will be less.
- Take it out of the oven when it is done and let it cool completely on a rack before cutting.
Nutrition
I HOPE YOU WILL TRY THIS AMAZINGLY EASY SOURDOUGH BREAD RECIPE!
Follow me on Pinterest to see all the great recipes and projects I am pinning!
While there are so many people telling me how daunting and intimidating this kind of bread is, broken down into steps it is simple. It is 4 simple ingredients. Only 1 hour of your time, and you get the most amazing bread. Yes there is the 12-24 hours of sitting and waiting for until you can bake it, but my gosh, it is so worth it!

This easy sourdough boule has become a regular at our house. You can easily find a schedule that will work for you! I tell you it is by far one of the easiest breads I make, despite all the time you wait.
Don’t forget to pin this for later!

Where do I get the sourdough starter. I want to make this bread.
You can make one yourself check out this post:
Everything You Need to Know About Sourdough and Sourdough Starters
Where do I buy the sourdough starter?
You can buy some online but making one of your own is easy, check out this post:
Everything You Need to Know About Sourdough and Sourdough Starters
Love this recipe. Wish I could print it, but the link to print brings me to a 404 error. Is it fixable?
I tried it and it worked, most likely it could be an issue on your internet?
Worth the effort.
This was incredible and so worth the time – which honestly was bad at all! Thank you for sharing this recipe! Will be making again for sure!
I am so so very glad! Thank you for the amazing rating!!
I am in the process of making this now and I think I will love this. It is resting before shaping and putting in the fridge for the night. I do have a question, though. When measuring the cup of starter, do I use a dry measure or wet measure. I used the liquid cup for this one but not sure if that is correct.
Yes the liquid cup
I used AP Flour by mistake and it was still awesome! Great rise, great crust and chew and flavor. Will make another one with Bread Flour to compare the two flours.
I have tried other sourdough recipes and this one is the best. Great tips sprinkled throughout the directions were so helpful. Gentle kneading every 10 minutes, ice in the Dutch oven, and a slow rise in the fridge make a big difference. Thank you!
Could I also mix this in a mixer?
I dont find it necessary, and it is more about specific folds and lifting for this. Couldnt hurt to try and see!
I love this recipe and have discovered the banneton makes a huge difference in the rise and texture of the bread. I have a question regarding the dough. My dough mixture is not as moist and sticky as your dough appears in your video. Should I be adding more water?
If its not as sticky, you can add more water. There are many variables, including how hydrated your starter is, if it is really runny, you will not need as much water, if its more on the dryer side, it will require a bit more water.
Seriously yummy bread! I finally figured out a starter and so now I make this at least 3 times a week! Only thing is my crust doesn’t get super crisp especially on the sides. It’s not going to stop me from enjoying it though! Won’t be so good for my waistline!!
My dutch oven is not supposed to be preheated. Will this recipe work if I don’t preheat the dutch oven?
I am not sure. You can always try it! It may not rise as much and bake as well.
To much flour. Had to add more water.
Depending on the flour you use, you may need to add more flour. I can make this 5 different times and depending on the hydration of the sourdough, the kind of flour I use and even the weather, my amounts will be different. I am sorry this did not work for you.
I have a standard size 6 qt dutch oven
I have tried & used sourdough starter, but I’m never real confident I’m doing things properly. To use my starter that’s been refrigerated, do I remove it from the fridge, discard half of it, feed it and let it sit 24 hours before testing to see if it’s ready to be used? Also, is the amount I feed it equal to the amount of starter? Thank you!
My bread is really dense, why so? There are like zero holes inside my bread. It’s still rose but super dense. I used all purpose Unbleached flour and maybe my starter was too thick?
How old was your sourdough starter? If it is new, a couple weeks old it needs more time.
I have never frozen mine so I am not sure
I read your post and was excited to give this sourdough recipe a try, but when I printed off the recipe and was in the middle of making the bread, I noticed that the step on bulk fermenting on the counter for 3-6 hours is missing from the printed instructions. Does that mean this step is optional?
Not sure why it would be missing. You definitely want to do the bulk fermentation.