
How to Remove Tile Backsplash (Without Damaging Drywall)
You can actually remove tile backsplash without ruining all your drywall! You know you want to replace that unsightly and outdated tile back splash. It can be a big project, but I want to help give you the best option, with a step by step process. Check out these simple tips on how to remove tile backsplash without damaging drywall or counter tops I will also be sharing amazing backsplash ideas at the end of the post.
Sometimes you buy a house, and you love everything about it. Some times you buy a house and you hate everything. Sometimes, what you loved changes and you want something different. That’s okay! That’s exactly what happened to me.
Choosing a kitchen backsplash:
Choosing a kitchen tile backsplash can be a very personal choice. I have a post all about choosing a backsplash here. You are the one that sees the backsplash every single day, all day long. Sometimes we feel like what we have we are stuck with unless we want to tear the walls out and start over.
Well, this does not need to be the case. We installed tile backsplash to my kitchen about 10 years ago. I was pregnant, and irrational, and I will admit that when you are pregnant you tend to make unwise choices…or just make choices you never would when you are hormonally all together. The tile was chosen on a whim, and immediately upon installation, I regretted it.
I knew it wasn’t what I wanted..but at that point, I wasn’t sure what I wanted, so I waited it out for quite a few years. This is not to say that the tile wasn’t pretty or stylish(it was beautiful), it just wasn’t the one, you know? But, crap….it was installed and that’s that right?
I kept it as long as possible, only because I had no idea how much work or what it would take to remove the tiles.
How to remove tile backsplash:
I decided to do a quick kitchen remodel and was willing to attempt figuring out how to remove my old tile backsplash by myself. You see…my husband was not a fan of what I was about to undertake and proclaimed he did not want to be part of the project. And guess what, I was just fine with that. I would figure out how to remove the tile and then I would install my new tile all by myself.
Seems a little overwhelming doesn’t it? Especially if you told your husband you could do it all yourself without his help. You better be pretty sure that you can! Don’t ever tell my I cant do it, because that’s when I will prove you wrong.
And guess what….I figured out how to remove tile backsplash without tearing up the walls and creating a giant mess. It was really easier than you may think…it just took a bit of care and specific tools….all of which were quite inexpensive.
This method may change depending on what kind of tile backsplash you have, but it should generally work for most.
How to know if you can remove kitchen backsplash tiles easily:
- The first thing you want to do is assess the situation. If your backsplash was installed incorrectly, directly on drywall or with some kind of adhesive like liquid nails(yes I have seen this before)…then this tutorial is probably not for you. In extreme cases, you may just have to tear out the drywall as well and start fresh.
Here’s a tip to find out how it was installed:
Tile removal can be difficult and daunting. There are a couple things to try to decide if your tile can be easily removed. Follow these easy steps:
Try to find an inconspicuous spot, like behind a stove or fridge where you can attempt removing whole tiles. You can also try the edge tile, where the backsplash ends. Try my methods below to attempt to take one tile off….and if the drywall is damaged or there is no possible way it will come off, you will be better off removing the tile with the drywall. Then you can install new drywall and install your new backsplash over it.
Tools You Will Need to Remove Tile Backsplash
- 6 in 1 painters tool
- hammer
- chisels
- utility knife(just in case)
- safety glasses and work gloves
- drop cloth to protect your counter top
- drywall joint compound
- You could use a dremel tool as well if you need to cut through thick old grout lines.
We had a small mosaic glass tile that had been installed directly over the painted walls. Since the walls has been primed and painted, this added a layer of protection between the drywall, the tile adhesive and the existing tile.
Since we had installed the previous tile, I knew that it was installed with a premixed tile mastic between the drywall and the tile. Mastic has a bit of a rubber feel to it, which is a good thing and a bad thing. It means it sticks to the wall, but it is more flexible and bendable making it easier to remove.
After inspecting the tiles, I decided I needed to loosen and weaken the connection between the tile and the wall.

First step to removing tile backsplash:
Find a place to start and gather your tools. I started on one end where there was access to the edge of the tile backsplash. You may want to start behind a refrigerator or on an edge where you can et access to the individual tiles.
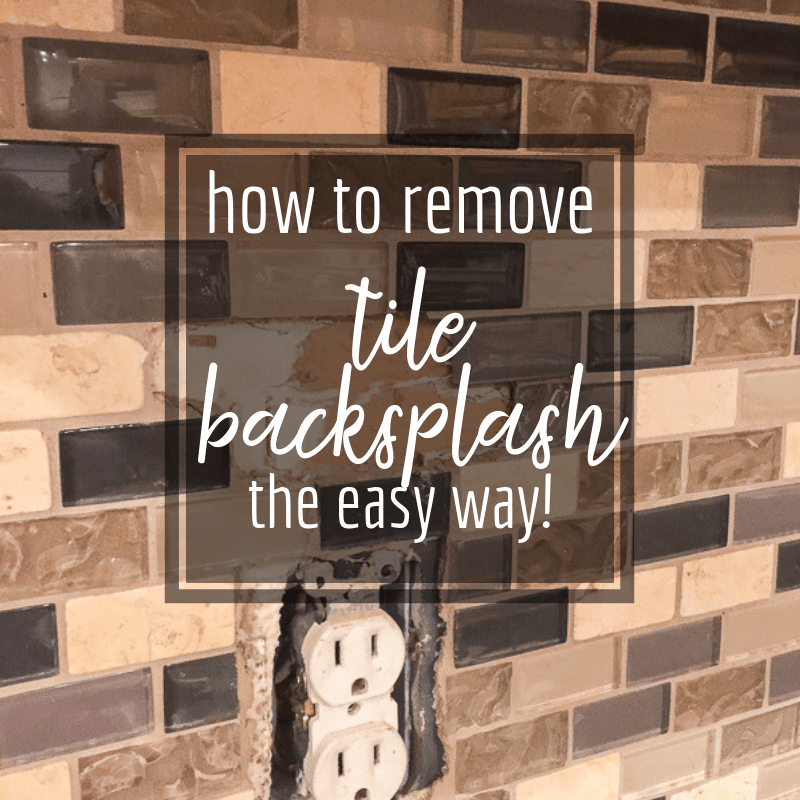
Take the 6 in 1 painter’s tool, chisel, or blade of your putty knife(whichever fits best) and carefully use the sharp edge of the tool, and use a hammer or rubber mallet to begin to break up the grout lines. This is what you can see in the image above.
I gently tapped the hammer on the chisel to start loosening the grout around the old backsplash. You DO NOT want to go at it with a heavy hand, and hammer away like a mad man….that is unless you want to replace all the drywall.
TIP: One tip to removing backsplash tile is to go in on an angle so that you do not go directly into the drywall. This is where those small chisels will come in handy.
Breaking up the grout will allow the tiles to loosen. Be mindful to not hit really hard when loosening the grout, because you could damage the drywall behind the tile. Do not be heavy handed with this process. You want to remove the tile without damaging the drywall.
Now that you have loosened the grout what do you do?
Once you have loosened the grout, take the long sharp edge of the 6 in 1 tool and begin to carefully hammering it between the wall and the tile. This is where the mastic or thin set is. If you have mastic, it will almost feel a bit rubbery when trying to hammer in between the two of them. Thin set will feel more like cement.

We had tile adhesive, and I think this made it more difficult. The thin set would kind of turn into dust and crumble away.
They key to taking your tile back splash off is to work in small sections. You want to try to work as close to the tile as possible so that you do not break into the drywall.
I cannot stress to you enough that you need to keep your chisels and 6 in 1 tool parallel with the wall when attempting to remove the tile. If you go in at any kind of an angle you will smack right into the drywall. Believe me…I have learned this the hard way.

Inevitably you will have some spots that are difficult and you may damage the drywall, but that is an easy fix. You can use drywall mud and a trowel if needed. Depending on the size of the damaged drywall you can use a drywall repair kit. These make it easy and provide everything you need to patch your drywall.
The secret to doing this successfully is to take your time and be patient. It can be slow going and sometimes you’ll feel like you are wasting your time. You can always just easily tear out the drywall but that is an added expense I did not want to invest in at the time.
You will notice that there are spots where the paint and very top of the drywall has come off. This will be okay. I simply sanded down any peeling edges and troweled over it with some drywall joint compound. Since it will be covered up by tile, you really only need to make sure it is flat. No raised edges. You can sand any raised edges down once the drywall is dry.

Here you can see my progress. I think it looks pretty great! There was only one spot above my stove that needed puttying. Not bad. Not bad at all. Now, if you wanted to be smarter than me, put down a sheet or some plastic to protect your countertops.
The job kind of got away with me which is how most jobs go around here. Little by little I was able to take the entire tile backsplash off without damaging the drywall.
I did have to patch a couple spots but overall I was able to remove all the tile and have a blank canvas to start again. This was definitely not an easy process and it took time and a light hand to remove the tile without damaging the drywall.
The secret of how to remove tile backsplash without damaging drywall:
- Have the correct tools
- Test out a hidden spot
- Work in small batches, making sure to keep your chisel parallel to the wall so that you avoid going directly into the drywall.
- Putty and patch any holes you may end up with using some drywall spackle
- Have patience and take your time.
And this… this is what I replaced it with.

I installed the square subway tiles all the way to the top of entire wall. I love this tile. It is a simple square white subway tile that I installed in a brick pattern. I grouted it with a light gray grout to add a bit of contrast to the tile.
It changes up the typical farmhouse subway tile, and adds a bit more of a modern mid-century flare? I don’t know for sure, but I like it.


Now that you have an idea of how to remove tile backsplash, how about some amazing backsplash ideas and tips? Check these out:
How to Choose a Kitchen Backsplash
Amazing Kitchen Backsplash Ideas
Over 50 of the Best Farmhouse Tile Backsplash Ideas
Let me be clear that I am not a construction expert. I am sharing what techniques have worked for me. I truly love working on projects in my home. Building and creating a beautiful spaces is my truest passion.
In another life, I think I might have been a general contractor. Building homes is one of my passions and I really hope I get a chance to do it again sometime soon.
Weirdly enough, I really love installing tiles as well. I have done many different tile jobs in my home…and when I say I, yes many of them I, myself did. Some of them my husband helped as well. We work well together, and I truly appreciate all the work he does for me.
Here are some of the rooms we have installed tile in. All these rooms had tile floors and backsplashes as well as some shower walls in my bathroom:
My Farmhouse Laundry Room One Year Later
One Room Challenge- Farmhouse Laundry Room Reveal!
Farmhouse Master Bathroom | Final Reveal
Now, my dear friends, I would love it if you shared this with others! This is how we keep these websites afloat! You can PIN IT to Pinterest, or share it one Facebook!

And with that! I wish you a great day!
I am off to work on my next project….who knows what it will be:)
Sara you are a superstar! That is NOT a fun job! To have done it and not wrecked the drywall, girl, you were determined, hahaha! I’m so impressed! Funny thing is, I’ve got square subway tiles we put in about 10years ago and I now want rectangular ones! LOL! It’s funny how our tastes change like that? We always want hat we don’t have. Your tiles look really good but I know you’re glad that job is done! Next! Glad you got to spend time with your grandma. 97 wow! You come from good stock! Thanks for the post. I pinned it twice because I know people are going to want to know how to do this, have a great day! ?
Thank you Sheila!
that is the same tile i have and I immediately regretted putting it up. I am going to remove it as soon as I pick out some replacement tiles. Though I will need to convince my husband to let me hire someone to put new tile up. I just am not that handy.
What grout did you use with the new backsplash? I plan to do white subway tiles, but I am torn between a white grout or a light grey grout. Curious of the grout brand and color you used because it looks great!
We used a grout from Lowes. Keracolor is warm grey.
once you had the tile off how did you prep the wall to put on the new tiles? I imagine it required some sanding?
I filled any holes and sanded those down but overall I did not need to sand the stuff that was in good shape.
Sara,I t was amazing to read your blog. It was like I wrote it myself and yes even the tiles are the same. I think it would have been easier for me to tell my husband I totaled the car than to tell him I wanted to change the tile we spent so much money on just 6 yrs ago. I am 66 yrs old now but I need to put in the labor as I can”t afford to have it professionally removed and my hubby said” you’re on your own with this one this “.This is a great tutorial. I know I can do it if I take my time and keep your tutorial close. Thanks so much and God Bless
Hey there. I just came across your post. Did you use 4×4 inch tiles for the new backsplash or are they 6×6? I want to do the same for my backsplash and can’t decide between the sizes.
We used 4 by 4 tile
Love the color of your bottom cabinets, did you paint those yourself? If so, what was the color?
Yes! Its called Downpipe by Farrow and Ball